Quantcast
Channel: Mac administration – Der Flounder
Viewing all 490 articles
Browse latest View live

Uninstalling macOS system extensions

$
0
0

With the ongoing change from kernel extensions to system extensions, one new thing Mac admins will need to learn is how to uninstall system extensions. Fortunately, Apple has provided a tool as of macOS Catalina that assists with this: systemextensionsctl

If you run the systemextensionsctl command by itself, you should get the following information about usage:

systemextensionsctl: usage:
	systemextensionsctl developer [on|off]
	systemextensionsctl list [category]
	systemextensionsctl reset  - reset all System Extensions state
	systemextensionsctl uninstall  ; can also accept '-' for teamID

The last verb, uninstall, is what allows us to remove system extensions. For more details, please see below the jump.

To uninstall a system extension using systemextensionsctl, you need to provide the following:

  • Team identifier of the certificate used to sign the system extension
  • Bundle identifier for the system extension

Locating Team and bundle identifiers

You can identify team and bundle identifiers by locating the system extension in question inside the application and running the following commands:

To identify the Team identifier:

codesign -dvvv /path/to/name_goes_here.systemextension 2>&1 | awk -F= '/^TeamIdentifier/ {print $NF}'

To identify the bundle identifier:

codesign -dvvv /path/to/name_goes_here.systemextension 2>&1 | awk -F= '/^Identifier/ {print $NF}'

For example, Microsoft Defender ATP currently has several system extensions within its application bundle:

  • /Applications/Microsoft Defender ATP.app/Contents/Library/SystemExtensions/com.microsoft.wdav.epsext.systemextension
  • /Applications/Microsoft Defender ATP.app/Contents/Library/SystemExtensions/com.microsoft.wdav.netext.systemextension
  • /Applications/Microsoft Defender ATP.app/Contents/Library/SystemExtensions/com.microsoft.wdav.tunnelext.systemextension

To find the bundle identifier for the com.microsoft.wdav.epsext.systemextension system extension, run the command shown below:

codesign -dvvv "/Applications/Microsoft Defender ATP.app/Contents/Library/SystemExtensions/com.microsoft.wdav.epsext.systemextension" 2>&1 | awk -F= '/^Identifier/ {print $NF}'

That should give you the following output:

username@computername ~ % codesign -dvvv "/Applications/Microsoft Defender ATP.app/Contents/Library/SystemExtensions/com.microsoft.wdav.epsext.systemextension" 2>&1 | awk -F= '/^Identifier/ {print $NF}'
com.microsoft.wdav.epsext
username@computername ~ %

To find the Team identifier for the com.microsoft.wdav.epsext.systemextension system extension, run the command shown below:

codesign -dvvv "/Applications/Microsoft Defender ATP.app/Contents/Library/SystemExtensions/com.microsoft.wdav.epsext.systemextension" 2>&1 | awk -F= '/^TeamIdentifier/ {print $NF}'

That should give you the following output:

username@computername ~ % codesign -dvvv "/Applications/Microsoft Defender ATP.app/Contents/Library/SystemExtensions/com.microsoft.wdav.epsext.systemextension" 2>&1 | awk -F= '/^TeamIdentifier/ {print $NF}'
UBF8T346G9
username@computername ~ %

Uninstalling a system extension

Once you have both, you can run the following command with root privileges to uninstall a system extension:

systemextensionsctl uninstall Team_Identifier_Goes_Here Bundle_Identifier_Goes_Here

For example, if you wanted to uninstall Microsoft Defender’s com.microsoft.wdav.epsext.systemextension system extension, you would run the following command with root privileges:

systemextensionsctl uninstall UBF8T346G9 com.microsoft.wdav.epsext

Note: As of September 1, 2020, running the systemextensionsctl uninstall command requires System Integrity Protection (SIP) to be disabled. This limitation is supposed to be removed by Apple at some point in the very near future.


Clearing failed MDM commands on Jamf Pro

$
0
0

For a variety of reasons, MDM commands sent out from an MDM server can fail to run correctly on a Mac. Many times, these MDM commands will not be re-sent unless the failure is cleared. With the failure cleared, the MDM server will not have a record of sending the MDM command and should try again.

On Jamf Pro, there’s a couple of ways you can clear failed MDM commands. The first is a manual process which uses the Jamf Pro admin console. The second uses the Jamf Pro Classic API and can be automated. For more details, please see below the jump.

Clearing failed MDM commands using the Jamf Pro admin console

To clear failed MDM commands using the admin console, please use the procedure shown below.

1. Run a search for the computers you want to clear.

Note: If you search with no criteria, the search results will list all Macs enrolled with the Jamf Pro server.

2. Once you have the desired list, click the Action button.

Screen Shot 2020 09 11 at 5 09 10 PM

3. Select Cancel Remote Commands and click the Next button.

Screen Shot 2020 09 11 at 5 09 29 PM

4. Select Cancel All Failed Commands and click the Next button.

Screen Shot 2020 09 11 at 5 09 39 PM

5. Once all failed commands have been cleared, click the Done button.

Screen Shot 2020 09 11 at 5 09 45 PM

Clearing failed MDM commands using the Jamf Pro Classic API

You can also use the Jamf Pro Classic API to script an automatic clearing of failed MDM commands at whatever interval is desired. There’s numerous ways to make this work, with my approach being the following:

1. Write a script designed to run via a Jamf Pro policy on individual Macs to perform the following tasks:

a. Use the API and the Mac’s hardware UUID to identify the Mac’s computer ID in Jamf Pro.
b. Use the API and the Mac’s hardware UUID to download the list of failed MDM commands.
c. Use the API and the Mac’s Jamf Pro computer ID clear all failed MDM commands associated with that Jamf Pro computer ID.

Note: For those who haven’t used the Jamf Pro Classic API before, you will need to provide a username and password to the script. This is a security risk, so my recommendation is to carefully evaluate if the risk is worth it for your environment. If it’s not, don’t use this approach.

One way to mitigate this risk is to set up a dedicated account with the least privileges necessary to accomplish the task of clearing the failed MDM commands. This method does not eliminate the risk, but it may reduce it to one acceptable in your environment.

In my testing, the least privileges are the following:

In Jamf Pro Server Objects:

Computers: Read

Screen Shot 2020 09 25 at 9 57 12 AM

In Jamf Pro Server Actions:

Flush MDM Commands

Screen Shot 2020 09 25 at 9 56 59 AM

2. Set up a Jamf Pro computer policy with the following components:

Script: The script to clear failed MDM commands
Trigger: Recurring Check-In
Execution Frequency: Once every day

Note: Execution Frequency can be set as desired for a longer interval, like Once every week or Once every month.

The script is available from following address on GitHub:

https://github.com/rtrouton/rtrouton_scripts/tree/master/rtrouton_scripts/Casper_Scripts/clear_failed_Jamf_Pro_mdm_commands

Backing up Jamf Pro Self Service bookmarks

$
0
0

As part of working with Jamf Pro, I prefer to be able to save as much of the existing configuration of it as possible. Normally I can do this via the Jamf Pro Classic API and I have a number of blog posts showing how I use the API to create backups of my Jamf Pro configuration.

However, one set of data which is not accessible via the API are the Self Service bookmarks.

Screen Shot 2020 09 27 at 11 29 48 AM

If I want to back up this information, is there a way outside of the API? It turns out that there is. For more details, please see below the jump.

After some digging around, I discovered that the Self Service bookmarks are automatically downloaded from the Jamf Pro server and stored locally on each Mac in the following directory:

/Library/Application Support/JAMF/Self Service/Managed Plug-ins

In this directory, there are .plist files named with the Jamf Pro ID number of the relevant Self Service bookmark.

Screen Shot 2020 09 27 at 11 31 16 AM

To make backups of the Self Service bookmarks, I’ve written a script which performs the following tasks:

  1. If necessary, create a directory for storing backup copies of the Self Service bookmark files.
  2. Make copies of the Self Service bookmark files.
  3. Name the copied files using the title of the Self Service bookmark.
  4. Store the copied bookmarks in the specified directory.

Once the script is run, you should see copies of the Self Service bookmark files appearing in the script-specified location.

Screen Shot 2020 09 27 at 11 43 33 AM

This location can be set manually or created automatically by the script.

Screen Shot 2020 09 27 at 11 42 59 AM

The script is available below, and at the following address on GitHub:

https://github.com/rtrouton/rtrouton_scripts/tree/master/rtrouton_scripts/Casper_Scripts/Jamf_Pro_Self_Service_Bookmark_Backup

Jamf_Pro_Self_Service_Bookmark_Backup.sh:

#!/bin/bash
# This script is designed to do the following:
#
# 1. If necessary, create a directory for storing backup copies of Jamf Pro Self Service bookmark files.
# 2. Make copies of the Self Service bookmark files.
# 3. Name the copied files using the title of the Self Service bookmark.
# 4. Store the copied bookmarks in the specified directory.
#
# If you choose to specify a directory to save the Self Service bookmarks into,
# please enter the complete directory path into the SelfServiceBookmarkBackupDirectory
# variable below.
SelfServiceBookmarkBackupDirectory=""
# If the SelfServiceBookmarkBackupDirectory isn't specified above, a directory will be
# created and the complete directory path displayed by the script.
error=0
if [[ -z "$SelfServiceBookmarkBackupDirectory" ]]; then
SelfServiceBookmarkBackupDirectory=$(mktemp -d)
echo "A location to store copied bookmarks has not been specified."
echo "Copied bookmarks will be stored in $SelfServiceBookmarkBackupDirectory."
fi
self_service_bookmarks="/Library/Application Support/JAMF/Self Service/Managed Plug-ins"
for bookmark in "$self_service_bookmarks"/*.plist
do
echo "Processing "$bookmark" file…"
bookmark_name=$(/usr/bin/defaults read "$bookmark" title)
cat "$bookmark" > "$SelfServiceBookmarkBackupDirectory/${bookmark_name}.plist"
if [[ $? -eq 0 ]]; then
echo "$bookmark_name.plist processed and stored in $SelfServiceBookmarkBackupDirectory."
else
echo "ERROR! Problem occurred when processing $self_service_bookmarks/$bookmark file!"
error=1
fi
done
exit $error
view raw gistfile1.txt hosted with ❤ by GitHub

Remotely gathering sysdiagnose files and uploading them to S3

$
0
0

One of the challenges for helpdesks with folks now working remotely instead of in offices has been that it’s now harder to gather logs from user’s Macs. A particular challenge for those folks working with AppleCare Enterprise Support has been with regards to requests for sysdiagnose logfiles.

The sysdiagnose tool is used for gathering a large amount of diagnostic files and logging, but the resulting output file is often a few hundred megabytes in size. This is usually too large to email, so alternate arrangements have to be made to get it off of the Mac in question and upload it to a location where the person needing the logs can retrieve them.

After needing to gather sysdiagnose files a few times, I’ve developed a scripted solution which does the following:

  • Collects a sysdiagnose file.
  • Creates a read-only compressed disk image containing the sysdiagnose file.
  • Uploads the compressed disk image to a specified S3 bucket in Amazon Web Services.
  • Cleans up the directories and files created by the script.

For more details, please see below the jump.

Pre-requisites

You will need to provide the following information to successfully upload the sysdiagnose file to an S3 bucket:

  • S3 bucket name
  • AWS region for the S3 bucket
  • AWS programmatic user’s access key and secret access key
  • The S3 ACL used on the bucket

The AWS programmatic user must have at minimum the following access rights to the specified S3 bucket:

  • s3:ListBucket
  • s3:PutObject
  • s3:PutObjectAcl

The AWS programmatic user must have at minimum the following access rights to all S3 buckets in the account:

  • s3:ListAllMyBuckets

These access rights will allow the AWS programmatic user the ability to do the following:

  1. Identify the correct S3 bucket
  2. Write the uploaded file to the S3 bucket

Note: The AWS programmatic user would not have the ability to read the contents of the S3 bucket.

Information on S3 ACLs can be found via the link below:
https://docs.aws.amazon.com/AmazonS3/latest/dev/acl-overview.htmlcanned-acl

In an S3 bucket’s default configuration, where all public access is blocked, the ACL should be the one listed below:

private

Using the script

Once you have the S3 bucket and AWS programmatic user set up, you will need to configure the user-editable variables in the script:

# User-editable variables
s3AccessKey="add_AWS_access_key_here"
s3SecretKey="add_AWS_secret_key_here"
s3acl="add_AWS_S3_ACL_here"
s3Bucket="add_AWS_S3_bucket_name_here"
s3Region="add_AWS_S3_region_here"
view raw
gistfile1.txt
hosted with ❤ by GitHub

For example, if you set up the following S3 bucket and user access:

What: S3 bucket named sysdiagnose-log-s3-bucket
Where: AWS’s US-East-1 region
ACL configuration: Default ACL configuration with all public access blocked
AWS access key: AKIAX0FXU19HY2NLC3NF
AWS secret access key: YWRkX0FXU19zZWNyZXRfa2V5X2hlcmUK

The user-editable variables should look like this:

# User-editable variables
s3AccessKey="AKIAX0FXU19HY2NLC3NF"
s3SecretKey="YWRkX0FXU19zZWNyZXRfa2V5X2hlcmUK"
s3acl="private"
s3Bucket="sysdiagnose-log-s3-bucket"
s3Region="us-east-1"
view raw
gistfile1.txt
hosted with ❤ by GitHub

Note: The S3 bucket, access key and secret access key information shown above is no longer valid.

The script can be run manually or by a systems management tool. I’ve tested it with Jamf Pro and it appears to work without issue.

When run manually in Terminal, you should see the following output.

username@computername ~ % sudo /Users/username/Desktop/remote_sysdiagnose_collection.sh
Password:
Progress:
[|||||||||||||||||||||||||||||||||||||||100%|||||||||||||||||||||||||||||||||||]
Output available at '/var/folders/zz/zyxvpxvq6csfxvn_n0000000000000/T/logresults-20201016144407.1wghyNXE/sysdiagnose-VMDuaUp36s8k-564DA5F0-0D34-627B-DE5E-A7FA6F7AF30B-20201016144407.tar.gz'.
………………………………………………………..
created: /var/folders/zz/zyxvpxvq6csfxvn_n0000000000000/T/sysdiagnoselog-20201016144407.VQgd61kP/VMDuaUp36s8k-564DA5F0-0D34-627B-DE5E-A7FA6F7AF30B-20201016144407.dmg
Uploading: /var/folders/zz/zyxvpxvq6csfxvn_n0000000000000/T/sysdiagnoselog-20201016144407.VQgd61kP/VMDuaUp36s8k-564DA5F0-0D34-627B-DE5E-A7FA6F7AF30B-20201016144407.dmg (application/octet-stream) to sysdiagnose-log-s3-bucket:VMDuaUp36s8k-564DA5F0-0D34-627B-DE5E-A7FA6F7AF30B-20201016144407.dmg
######################################################################### 100.0%
VMDuaUp36s8k-564DA5F0-0D34-627B-DE5E-A7FA6F7AF30B-20201016144407.dmg uploaded successfully to sysdiagnose-log-s3-bucket.
username@computername ~ %
view raw
gistfile1.txt
hosted with ❤ by GitHub

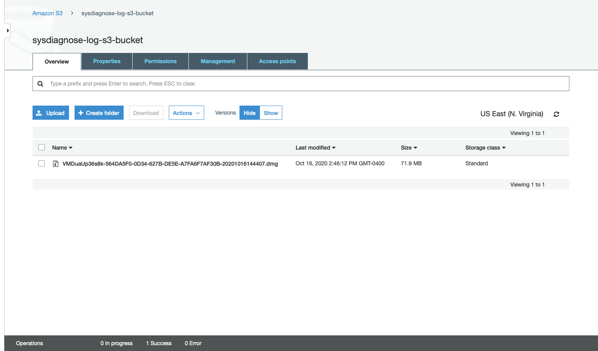
Once the script runs, you should see a disk image file appear in the S3 bucket with a name automatically generated using the following information:

Mac’s serial number – Mac’s hardware UUID – Year-Month-Day-Hour-Minute-Second

Screen Shot 2020 10 16 at 2 51 08 PM

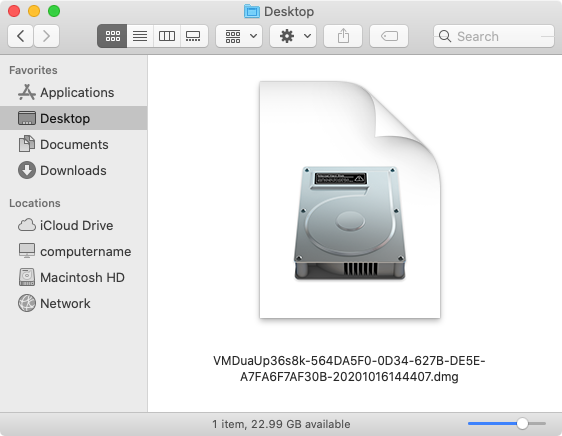
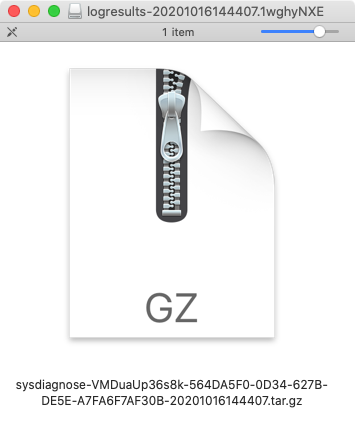
Once downloaded, the sysdiagnose file is accessible by mounting the disk image.

Screen Shot 2020 10 16 at 2 53 58 PM

Screen Shot 2020 10 16 at 2 52 27 PM

The script is available below, and at the following address on GitHub:

https://github.com/rtrouton/rtrouton_scripts/tree/master/rtrouton_scripts/remote_sysdiagnose_collection

#!/bin/bash
# Log collection script which performs the following tasks:
#
# * Collects a sysdiagnose file.
# * Creates a read-only compressed disk image containing the sysdiagnose file.
# * Uploads the compressed disk image to a specified S3 bucket.
# * Cleans up the directories and files created by the script.
#
# You will need to provide the following information to successfully upload
# to an S3 bucket:
#
# S3 bucket name
# AWS region for the S3 bucket
# AWS programmatic user's access key and secret access key
# The S3 ACL used on the bucket
#
# The AWS programmatic user must have at minimum the following access rights to the specified S3 bucket:
#
# s3:ListBucket
# s3:PutObject
# s3:PutObjectAcl
#
# The AWS programmatic user must have at minimum the following access rights to all S3 buckets in the account:
#
# s3:ListAllMyBuckets
#
# These access rights will allow the AWS programmatic user the ability to do the following:
#
# A. Identify the correct S3 bucket
# B. Write the uploaded file to the S3 bucket
#
# Note: The AWS programmatic user would not have the ability to read the contents of the S3 bucket.
#
# Information on S3 ACLs can be found via the link below:
# https://docs.aws.amazon.com/AmazonS3/latest/dev/acl-overview.html#canned-acl
#
# By default, the ACL should be the one listed below:
#
# private
#
# User-editable variables
s3AccessKey="add_AWS_access_key_here"
s3SecretKey="add_AWS_secret_key_here"
s3acl="add_AWS_S3_ACL_here"
s3Bucket="add_AWS_S3_bucket_name_here"
s3Region="add_AWS_S3_region_here"
# It should not be necessary to edit any of the variables below this line.
error=0
date=$(date +%Y%m%d%H%M%S)
serial_number=$(ioreg -c IOPlatformExpertDevice -d 2 | awk -F\" '/IOPlatformSerialNumber/{print $(NF-1)}')
hardware_uuid=$(ioreg -ad2 -c IOPlatformExpertDevice | xmllint –xpath '//key[.="IOPlatformUUID"]/following-sibling::*[1]/text()')
results_directory=$(mktemp -d -t logresults-${date})
sysdiagnose_name="sysdiagnose-${serial_number}${hardware_uuid}${date}.tar.gz"
dmg_name="${serial_number}${hardware_uuid}${date}.dmg"
dmg_file_location=$(mktemp -d -t sysdiagnoselog-${date})
fileName=$(echo "$dmg_file_location"/"$dmg_name")
contentType="application/octet-stream"
LogGeneration()
{
/usr/bin/sysdiagnose -f ${results_directory} -A "$sysdiagnose_name" -u -b
if [[ -f "$results_directory/$sysdiagnose_name" ]]; then
/usr/bin/hdiutil create -format UDZO -srcfolder ${results_directory} ${dmg_file_location}/${dmg_name}
else
echo "ERROR! Log file not created!"
error=1
fi
}
S3Upload()
{
# S3Upload function taken from the following site:
# https://very.busted.systems/shell-script-for-S3-upload-via-curl-using-AWS-version-4-signatures
usage()
{
cat <<USAGE
Simple script uploading a file to S3. Supports AWS signature version 4, custom
region, permissions and mime-types. Uses Content-MD5 header to guarantee
uncorrupted file transfer.
Usage:
`basename $0` aws_ak aws_sk bucket srcfile targfile [acl] [mime_type]
Where <arg> is one of:
aws_ak access key ('' for upload to public writable bucket)
aws_sk secret key ('' for upload to public writable bucket)
bucket bucket name (with optional @region suffix, default is us-east-1)
srcfile path to source file
targfile path to target (dir if it ends with '/', relative to bucket root)
acl s3 access permissions (default: public-read)
mime_type optional mime-type (tries to guess if omitted)
Dependencies:
To run, this shell script depends on command-line curl and openssl, as well
as standard Unix tools
Examples:
To upload file '~/blog/media/image.png' to bucket 'storage' in region
'eu-central-1' with key (path relative to bucket) 'media/image.png':
`basename $0` ACCESS SECRET storage@eu-central-1 \\
~/blog/image.png media/
To upload file '~/blog/media/image.png' to public-writable bucket 'storage'
in default region 'us-east-1' with key (path relative to bucket) 'x/y.png':
`basename $0` '' '' storage ~/blog/image.png x/y.png
USAGE
exit 0
}
guessmime()
{
mime=`file -b –mime-type $1`
if [ "$mime" = "text/plain" ]; then
case $1 in
*.css) mime=text/css;;
*.ttf|*.otf) mime=application/font-sfnt;;
*.woff) mime=application/font-woff;;
*.woff2) mime=font/woff2;;
*rss*.xml|*.rss) mime=application/rss+xml;;
*) if head $1 | grep '<html.*>' >/dev/null; then mime=text/html; fi;;
esac
fi
printf "$mime"
}
if [ $# -lt 5 ]; then usage; fi
# Inputs.
aws_ak="$1" # access key
aws_sk="$2" # secret key
bucket=`printf $3 | awk 'BEGIN{FS="@"}{print $1}'` # bucket name
region=`printf $3 | awk 'BEGIN{FS="@"}{print ($2==""?"us-east-1":$2)}'` # region name
srcfile="$4" # source file
targfile=`echo -n "$5" | sed "s/\/$/\/$(basename $srcfile)/"` # target file
acl=${6:-'public-read'} # s3 perms
mime=${7:-"`guessmime "$srcfile"`"} # mime type
md5=`openssl md5 -binary "$srcfile" | openssl base64`
# Create signature if not public upload.
key_and_sig_args=''
if [ "$aws_ak" != "" ] && [ "$aws_sk" != "" ]; then
# Need current and file upload expiration date. Handle GNU and BSD date command style to get tomorrow's date.
date=`date -u +%Y%m%dT%H%M%SZ`
expdate=`if ! date -v+1d +%Y-%m-%d 2>/dev/null; then date -d tomorrow +%Y-%m-%d; fi`
expdate_s=`printf $expdate | sed s/-//g` # without dashes, as we need both formats below
service='s3'
# Generate policy and sign with secret key following AWS Signature version 4, below
p=$(cat <<POLICY | openssl base64
{ "expiration": "${expdate}T12:00:00.000Z",
"conditions": [
{"acl": "$acl" },
{"bucket": "$bucket" },
["starts-with", "\$key", ""],
["starts-with", "\$content-type", ""],
["content-length-range", 1, `ls -l -H "$srcfile" | awk '{print $5}' | head -1`],
{"content-md5": "$md5" },
{"x-amz-date": "$date" },
{"x-amz-credential": "$aws_ak/$expdate_s/$region/$service/aws4_request" },
{"x-amz-algorithm": "AWS4-HMAC-SHA256" }
]
}
POLICY
)
# AWS4-HMAC-SHA256 signature
s=`printf "$expdate_s" | openssl sha256 -hmac "AWS4$aws_sk" -hex | sed 's/(stdin)= //'`
s=`printf "$region" | openssl sha256 -mac HMAC -macopt hexkey:"$s" -hex | sed 's/(stdin)= //'`
s=`printf "$service" | openssl sha256 -mac HMAC -macopt hexkey:"$s" -hex | sed 's/(stdin)= //'`
s=`printf "aws4_request" | openssl sha256 -mac HMAC -macopt hexkey:"$s" -hex | sed 's/(stdin)= //'`
s=`printf "$p" | openssl sha256 -mac HMAC -macopt hexkey:"$s" -hex | sed 's/(stdin)= //'`
key_and_sig_args="-F X-Amz-Credential=$aws_ak/$expdate_s/$region/$service/aws4_request -F X-Amz-Algorithm=AWS4-HMAC-SHA256 -F X-Amz-Signature=$s -F X-Amz-Date=${date}"
fi
# Upload. Supports anonymous upload if bucket is public-writable, and keys are set to ''.
echo "Uploading: $srcfile ($mime) to $bucket:$targfile"
curl \
-# -k \
-F key=$targfile \
-F acl=$acl \
$key_and_sig_args \
-F "Policy=$p" \
-F "Content-MD5=$md5" \
-F "Content-Type=$mime" \
-F "file=@$srcfile" \
https://${bucket}.s3.amazonaws.com/ | cat # pipe through cat so curl displays upload progress bar, *and* response
}
CleanUp()
{
if [[ -d ${results_directory} ]]; then
/bin/rm -rf ${results_directory}
fi
if [[ -d ${dmg_file_location} ]]; then
/bin/rm -rf ${dmg_file_location}
fi
}
LogGeneration
if [[ -f ${fileName} ]]; then
S3Upload "$s3AccessKey" "$s3SecretKey" "$s3Bucket"@"$s3Region" ${fileName} "$dmg_name" "$s3acl" "$contentType"
if [[ $? -eq 0 ]]; then
echo "$dmg_name uploaded successfully to $s3Bucket."
else
echo "ERROR! Upload of $dmg_name failed!"
error=1
fi
else
echo "ERROR! Creating $dmg_name failed! No upload attempted."
error=1
fi
CleanUp
exit $error

Extension attributes for Jamf Protect

$
0
0

I’ve started working with Jamf Protect and, as part of that, I found that I needed to be able to report the following information about Jamf Protect to Jamf Pro:

  1. Is the Jamf Protect agent installed on a particular Mac?
  2. Is the Jamf Protect agent running on a particular Mac?
  3. Which Jamf Protect server is a particular Mac handled by?

To address these needs, I’ve written three Jamf Pro extension attributes which display the requested information as part of a Mac’s inventory record in Jamf Pro. For more details, please see below the jump:

The three Extension Attributes do the following:

jamf_protect_installed.sh: Checks to see if Jamf Protect is installed and the agent is able to run.

https://github.com/rtrouton/rtrouton_scripts/tree/master/rtrouton_scripts/Casper_Extension_Attributes/jamf_protect_installed

Jamf Pro Extension Attribute Setup1

jamf_protect_status.sh: Checks and validates the following:

  • Jamf Protect is installed
  • The Jamf Protect processes are running

https://github.com/rtrouton/rtrouton_scripts/tree/master/rtrouton_scripts/Casper_Extension_Attributes/jamf_protect_status

Jamf Pro Extension Attribute Setup3

jamf_protect_server.sh: Checks to see if Jamf Protect’s protectctl tool is installed on a particular Mac. If the protectctl tool is installed, check for and display the Jamf Protect tenant name.

https://github.com/rtrouton/rtrouton_scripts/tree/master/rtrouton_scripts/Casper_Extension_Attributes/jamf_protect_server

Jamf Pro Extension Attribute Setup2

Detecting kernel panics using Jamf Pro

$
0
0

Something that has (mostly) become more rare on the Mac platform are kernel panics, which are computer errors from which the operating system cannot safely recover without risking major data loss. Since a kernel panic means that the system has to halt or automatically reboot, this is a major inconvenience to the user of the computer.

6lYdt

Kernel panics are always the result of a software bug, either in Apple’s code or in the code of a third party’s kernel extension. Since they are always from bugs and they cause work interruptions, it’s a good idea to get on top of kernel panic issues as quickly as possible. To assist with this, a Jamf Pro Extension Attribute has been written to detect if a kernel panic has taken place. For more details, please see below the jump.

When a Mac has a kernel panic, the information from the panic is logged to a log file in /Library/Logs/DiagnosticReports. This log file will be named something similar to this:

Kernel-date-goes-here.panic

The Extension Attribute is based off an earlier example posted by Mike Morales on the Jamf Nation forums. It performs the following tasks:

  1. Checks to see if there are any logs in the /Library/Logs/DiagnosticReports with a .panic file extension.
  2. If there are, check to see which are from the past seven days.
  3. Output a count of how many .panic logs were generated in the past seven days.

To test the Extension Attribute, it is possible to force a kernel panic on a Mac. To do this, please use the process shown below:

1. Disable System Integrity Protection
2. Run the following command with root privileges:

dtrace -w -n "BEGIN{ panic();}"

Screen Shot 2020 11 10 at 10 52 23 AM

3. After the kernel panic, run a Jamf Pro inventory update.

After the inventory update, it should show that at least one kernel panic had occurred on that Mac. For more information about kernel panics, please see the link below:

https://developer.apple.com/library/content/technotes/tn2004/tn2118.html

The Extension Attribute is available below and at the following address on GitHub:

https://github.com/rtrouton/rtrouton_scripts/tree/master/rtrouton_scripts/Casper_Extension_Attributes/kernel_panic_detection

#!/bin/bash
# Detects kernel panics which occurred in the last seven days.
#
# Original idea and script from here:
# https://www.jamf.com/jamf-nation/discussions/23976/kernal-panic-reporting#responseChild145035
#
# This Jamf Pro Extension Attribute is designed to
# check the contents of /Library/Logs/DiagnosticReports
# and report on how many log files with the file suffix
# of ".panic" were created in the previous seven days.
PanicLogCount=$(/usr/bin/find /Library/Logs/DiagnosticReports -Btime -7 -name *.panic | grep . -c)
echo "<result>$PanicLogCount</result>"
exit 0
view raw
gistfile1.txt
hosted with ❤ by GitHub

Preventing the macOS Big Sur upgrade advertisement from appearing in the Software Update preference pane on macOS Catalina

$
0
0

Not yet ready for macOS Big Sur in your environment, but you’ve trained your folks to look at the Software Update preference pane to see if there’s available updates? One of the ways Apple is advertising the macOS Big Sur upgrade is via the Software Update preference pane:

Screen Shot 2020 11 12 at 2 25 15 PM

You can block it from appearing using the softwareupdate –ignore command, but for macOS Catalina, Mojave and High Sierra, that command now requires one of the following enrollments as a pre-requisite:

  • Apple Business Manager enrollment
  • Apple School Manager enrollment
  • Enrollment in a user-approved MDM

For more information on this, please reference the following KBase article: https://support.apple.com/HT210642 (search for the following: Major new releases of macOS can be hidden when using the softwareupdate(8) command).

For more details, please see below the jump.

Once that pre-requisite condition has been satisfied, run the following command with root privileges:

softwareupdate --ignore "macOS Big Sur"

You should see text appear which looks like this:

Ignored updates:
(
"macOS Big Sur"
)

Screen Shot 2020 11 12 at 2 28 44 PM

The advertisement banner should now be removed from the Software Update preference pane.

Screen Shot 2020 11 12 at 2 28 58 PM

Note: If the pre-requisite condition has not been fulfilled, running the softwareupdate –ignore command will have no effect.

Screen Shot 2020 11 12 at 2 28 03 PM

Installing Rosetta 2 on Apple Silicon Macs

$
0
0

With Apple now officially selling Apple Silicon Macs, there’s a design decision which Apple made with macOS Big Sur that may affect various Mac environments:

At this time, macOS Big Sur does not install Rosetta 2 by default on Apple Silicon Macs.

Rosetta 2 is Apple’s software solution for aiding in the transition from Macs running on Intel processors to Macs running on Apple Silicon processors. It allows most Intel apps to run on Apple Silicon without issues, which provides time for vendors to update their software to a Universal build which can run on both Intel and Apple Silicon.

Without Rosetta 2 installed, Intel apps do not run on Apple Silicon. So for those folks who need Rosetta 2, how to install it? For more details, please see below the jump.

You can install Rosetta 2 on Apple Silicon Macs using the softwareupdate command. To install Rosetta 2, run the following command with root privileges:

/usr/sbin/softwareupdate --install-rosetta

Installing this way will cause an interactive prompt to appear, asking you to agree to the Rosetta 2 license. If you want to perform a non-interactive install, please run the following command with root privileges to install Rosetta 2 and agree to the license in advance:

/usr/sbin/softwareupdate --install-rosetta --agree-to-license

Having the the non-interactive method for installing Rosetta 2 available makes it easier to script the installation process. My colleague Graham Gilbert has written a script for handling this process and discussed it here:

https://grahamgilbert.com/blog/2020/11/13/installing-rosetta-2-on-apple-silicon-macs/

I’ve written a similar script to Graham’s, which is available below and from the following address on GitHub:

https://github.com/rtrouton/rtrouton_scripts/tree/master/rtrouton_scripts/install_rosetta_on_apple_silicon

#!/bin/bash
# Installs Rosetta as needed on Apple Silicon Macs.
exitcode=0
# Determine OS version
# Save current IFS state
OLDIFS=$IFS
IFS='.' read osvers_major osvers_minor osvers_dot_version <<< "$(/usr/bin/sw_vers -productVersion)"
# restore IFS to previous state
IFS=$OLDIFS
# Check to see if the Mac is reporting itself as running macOS 11
if [[ ${osvers_major} -ge 11 ]]; then
# Check to see if the Mac needs Rosetta installed by testing the processor
processor=$(/usr/sbin/sysctl -n machdep.cpu.brand_string | grep -o "Intel")
if [[ -n "$processor" ]]; then
echo "$processor processor installed. No need to install Rosetta."
else
# Check for an installer receipt for Rosetta. If no receipt is found,
# perform a non-interactive install of Rosetta.
rosetta_check=$(/usr/sbin/pkgutil –pkgs | grep "com.apple.pkg.RosettaUpdateAuto")
if [[ -z "$rosetta_check" ]]; then
/usr/sbin/softwareupdate –install-rosetta –agree-to-license
if [[ $? -eq 0 ]]; then
echo "Rosetta has been successfully installed."
else
echo "Rosetta installation failed!"
exitcode=1
fi
else
echo "Rosetta is already installed. Nothing to do."
fi
fi
else
echo "Mac is running macOS $osvers_major.$osvers_minor.$osvers_dot_version."
echo "No need to install Rosetta on this version of macOS."
fi
exit $exitcode

Identifying Universal 2 apps on macOS Mojave and later

$
0
0

As Apple introduces its new Apple Silicon Macs, it’s important that Mac admins be able to identify if their environment’s software will be able to run natively on both Intel and Apple Silicon as Universal 2 apps or if they’ll need Apple’s Rosetta 2 translation service installed first on their Apple Silicon Macs to allow their apps to run.

To assist with this identification effort, Apple has provided two tools:

Both have been around for a while and initially helped identify the original Universal binaries, which were compiled to support both PowerPC and Intel processors. They’ve now been updated for this new processor transition and either will be able to identify if an app’s binary was compiled for the following:

  • x86_64 (Intel)
  • arm64 (Apple Silicon)
  • Both x86_64 and arm64 (Universal 2)

For more details, please see below the jump.

To identify if an app is Intel-only or Universal using the lipo tool, please use the command shown below:

lipo -detailed_info /path/to/binary

For example, on macOS Catalina 10.15.7 Apple’s Safari browser is an Intel-only binary, since macOS Catalina won’t run on an Apple Silicon Mac. Running lipo on macOS Catalina 10.15.7’s Safari should produce output similar to what’s shown below:

username@computername ~ % lipo -detailed_info /Applications/Safari.app/Contents/MacOS/Safari
input file /Applications/Safari.app/Contents/MacOS/Safari is not a fat file
Non-fat file: /Applications/Safari.app/Contents/MacOS/Safari is architecture: x86_64
username@computername ~ %

Likewise, Jamf Pro 10.25.2’s jamf binary now supports both Intel and Apple Silicon. Running the lipo command described above should produce output similar to what’s shown below:

username@computername ~ % lipo -detailed_info /usr/local/jamf/bin/jamf
Fat header in: /usr/local/jamf/bin/jamf
fat_magic 0xcafebabe
nfat_arch 2
architecture x86_64
cputype CPU_TYPE_X86_64
cpusubtype CPU_SUBTYPE_X86_64_ALL
capabilities 0x0
offset 16384
size 6441136
align 2^14 (16384)
architecture arm64
cputype CPU_TYPE_ARM64
cpusubtype CPU_SUBTYPE_ARM64_ALL
capabilities 0x0
offset 6471680
size 6121168
align 2^14 (16384)
username@computername ~ %

To identify if an app is Intel-only or Universal using the file tool, please use the command shown below:

file /path/to/binary

Running the file command described above on macOS Catalina 10.15.7’s Safari should produce output similar to what’s shown below:

username@computername ~ % file /Applications/Safari.app/Contents/MacOS/Safari
/Applications/Safari.app/Contents/MacOS/Safari: Mach-O 64-bit executable x86_64
username@computername ~ %

Running the file command described above on the Jamf Pro 10.25.2 jamf binary should produce output similar to what’s shown below:

username@computername ~ % file /usr/local/jamf/bin/jamf
/usr/local/jamf/bin/jamf: Mach-O universal binary with 2 architectures: [x86_64:Mach-O 64-bit executable x86_64] [arm64]
/usr/local/jamf/bin/jamf (for architecture x86_64):	Mach-O 64-bit executable x86_64
/usr/local/jamf/bin/jamf (for architecture arm64):	Mach-O 64-bit executable arm64
username@computername ~ %

For more information about app testing, Howard Oakley has a blog post discussing the lipo tool in more detail which I recommend checking out. I’ve linked to it below:

Magic, lipo and testing for Universal binaries:
https://eclecticlight.co/2020/07/24/magic-lipo-and-testing-for-universal-binaries/

Resizing an AWS macOS EC2 instance’s boot drive to use all available disk space

$
0
0

I’ve started working with Amazon Web Service’s new macOS EC2 instances and after a while, I noticed that no matter how much EBS drive space I assigned to a EC2 instance running macOS, the instance would only have around 30 GBs of usable space. In this example, I had assigned around 200 GBs of EBS storage, but the APFS container was only using around 30 GBs of the available space.

Screen Shot 2020 12 19 at 3 23 59 PM

After talking with AWS Support, there’s a fix for this using APFS container resizing. This is a topic I’ve discussed previously in the context of resizing boot drives for virtual machines. For more details, see below the jump.

To resize a macOS EC2 instance’s boot volume, you need to do two things:

1. Identify the appropriate APFS container:

APFS containers act as storage pools for APFS volumes. APFS volumes are what act as the mounted filesystem, where you store your files, directories, metadata, etc. When you grow the APFS container, the APFS volumes will likewise get additional space.

To identify the container for the instance’s boot volume, use the command shown below:

/usr/sbin/diskutil list physical external | awk '/Apple_APFS/ {print $7}'

Screen Shot 2020 12 19 at 3 47 03 PM

2. Once the appropriate APFS container has been identified, use diskutil to resize the container with all available disk space.

You can specify a size of zero (0) to grow the targeted container using all unallocated drive space.

/usr/sbin/diskutil apfs resizeContainer apfs_container_id_goes_here 0

In this example, I have an instance where my APFS-formatted boot drive is using 32 GBs of space, but the instance has 200 GBs of available EBS disk space.

Assuming that the command above gave us disk1s2 as a result, the command shown below can be used to resize the boot drive’s APFS container with all available disk space.

/usr/sbin/diskutil apfs resizeContainer disk1s2 0
ec2-user@ip-172-31-23-238 ~ % /usr/sbin/diskutil apfs resizeContainer disk1s2 0
Started APFS operation
Aligning grow delta to 182,536,110,080 bytes and targeting a new physical store size of 214,538,608,640 bytes
Determined the maximum size for the targeted physical store of this APFS Container to be 214,537,580,544 bytes
Resizing APFS Container designated by APFS Container Reference disk2
The specific APFS Physical Store being resized is disk1s2
Verifying storage system
Using live mode
Performing fsck_apfs -n -x -l -S /dev/disk1s2
Checking the container superblock
Checking the EFI jumpstart record
Checking the space manager
Checking the space manager free queue trees
Checking the object map
Checking volume
Checking the APFS volume superblock
The volume Macintosh HD – Data was formatted by newfs_apfs (1412.141.1) and last modified by apfs_kext (1412.141.1)
Checking the object map
Checking the snapshot metadata tree
Checking the snapshot metadata
Checking the extent ref tree
Checking the fsroot tree
Checking volume
Checking the APFS volume superblock
The volume Preboot was formatted by diskmanagementd (1412.141.1) and last modified by apfs_kext (1412.141.1)
Checking the object map
Checking the snapshot metadata tree
Checking the snapshot metadata
Checking the extent ref tree
Checking the fsroot tree
Checking volume
Checking the APFS volume superblock
The volume Recovery was formatted by diskmanagementd (1412.141.1) and last modified by apfs_kext (1412.141.1)
Checking the object map
Checking the snapshot metadata tree
Checking the snapshot metadata
Checking the extent ref tree
Checking the fsroot tree
Checking volume
Checking the APFS volume superblock
The volume VM was formatted by diskmanagementd (1412.141.1) and last modified by
Checking the object map
Checking the snapshot metadata tree
Checking the snapshot metadata
Checking the extent ref tree
Checking the fsroot tree
Checking volume
Checking the APFS volume superblock
The volume Macintosh HD was formatted by diskmanagementd (1412.141.1) and last modified by apfs_kext (1412.141.1)
Checking the object map
Checking the snapshot metadata tree
Checking the snapshot metadata
Checking the extent ref tree
Checking the fsroot tree
Verifying allocated space
The volume /dev/disk1s2 appears to be OK
Storage system check exit code is 0
Growing APFS Physical Store disk1s2 from 32,002,498,560 to 214,538,608,640 bytes
Modifying partition map
Growing APFS data structures
Finished APFS operation
ec2-user@ip-172-31-23-238 ~ %
view raw
gistfile1.txt
hosted with ❤ by GitHub

Once the container resizing has completed, the OS should now recognize and be able to use the now-allocated space.

Screen Shot 2020 12 19 at 3 35 47 PM

This can be confirmed by other disk space measuring tools.

ec2-user@ip-172-31-23-238 ~ % df -h
Filesystem Size Used Avail Capacity iused ifree %iused Mounted on
/dev/disk2s5 200Gi 10Gi 181Gi 6% 488252 2094615348 0% /
devfs 186Ki 186Ki 0Bi 100% 642 0 100% /dev
/dev/disk2s1 200Gi 5.7Gi 181Gi 4% 161309 2094942291 0% /System/Volumes/Data
/dev/disk2s4 200Gi 2.0Gi 181Gi 2% 1 2095103599 0% /private/var/vm
map auto_home 0Bi 0Bi 0Bi 100% 0 0 100% /System/Volumes/Data/home
ec2-user@ip-172-31-23-238 ~ %
view raw
gistfile1.txt
hosted with ❤ by GitHub

Setting up AutoPkg, AutoPkgr and JSSImporter on an Amazon Web Services macOS EC2 instance

$
0
0

One of the outcomes of the recent Amazon Web Service’s Insight conference was AWS’s announcement that, as of November 30th, macOS EC2 instances were going to be available as on-demand instances or as part of one of AWS’s reduced cost plans for those who needed them long-term.

There are a few differences about AWS’s macOS offerings, as opposed to their Linux and Windows offerings. macOS EC2 instances are set up to run on actual Apple hardware, as opposed to being completely virtualized. This means that there are the following dependencies to be aware of:

  1. macOS EC2 instances must run on dedicated hosts (AWS has stated these are Mac Minis)
  2. One macOS EC2 instance can be provisioned per dedicated host.

AWS has also stipulated that that dedicated hosts for macOS EC2 instances have a minimum billing duration of 24 hours. That means that even if your dedicated host was only up and running for one hour, you will be billed as if it was running for 24 hours.

For now, only certain AWS regions have EC2 Mac instances available. As of December 20th, 2020, macOS EC2 instances are available in the following AWS Regions:

  • US-East-1 (Northern Virginia)
  • US-East-2 (Ohio)
  • US-West-2 (Oregon)
  • EU-West-1 (Ireland)
  • AP-Southeast-1 (Singapore)

The macOS EC2 instances at this time support two versions of macOS:

macOS Big Sur is not yet supported as of December 20th, 2020, but AWS has stated that Big Sur support will be coming shortly.

By default, macOS EC2 instances will include the following pre-installed software:

For folks looking to build services or do continuous integration testing on macOS, it’s clear that AWS went to considerable lengths to have macOS EC2 instances be as fully-featured as their other EC2 offerings. Amazon has also either made it possible to install the tools you need or just went ahead and installed them for you. They’ve also included drivers for their faster networking options and made it possible to manage and monitor Mac EC2 instances using AWS’s tools just like their Linux and Windows EC2 instances.

That said, all of this comes with a price tag. Here’s how it works out (all figures expressed in US dollars):

mac1 Dedicated Hosts (on-demand pricing):

$1.083/hour (currently with a 24 hour minimum charge, after which billing is by the second.)
$25.99/day
$181.93/week
$9493.58/year

Now, you can sign up for an AWS Savings Plan and save some money by paying up-front for one year or three years. Paying for three years, all cash up front is the cheapest option currently available:

$0.764/hour
$18.33/day
$128.31/week
$6697.22/year

Now some folks are going to look at that and have a heart attack, while others are going to shrug because the money involved amounts to a rounding error on their existing AWS bill. I’m mainly going through this to point out that hosting Mac services on AWS is going to come with costs. None of AWS’s existing Mac offerings are part of AWS’s Free Tier.

OK, so we’ve discussed a lot of the background but let’s get to the point: How do you set up AutoPkg to run in the AWS cloud? For more details, please see below the jump.

If you’ve worked with Amazon Web Service’s EC2 service previously, getting AutoPkg up and running in AWS should be fairly straightforward. That said, if you haven’t worked with either AWS or EC2 before, there may be a bit of a learning curve. For folks in this situation, I gave a talk on Amazon Web Services which should help get you started:

Getting Started with Amazon Web Services: http://docs.macsysadmin.se/2018/video/Day4Session4.mp4

In this example, I’m going to setting up a macOS EC2 instance with the following:

  • git
  • AutoPkg
  • AutoPkgr
  • JSSImporter

Pre-requisites:

  • An Amazon Web Services account
  • Money (at least $25.99)

Setting up a dedicated host

To run a macOS instance in EC2, you need to first choose an actual Mac Mini to run that instance on. Amazon refers to this as a dedicated host and the process looks like this:

1. Open the Amazon EC2 web console at https://console.aws.amazon.com/ec2/.

2. In the navigation pane, choose Dedicated Hosts.

Screen Shot 2020 12 18 at 2 48 07 PM

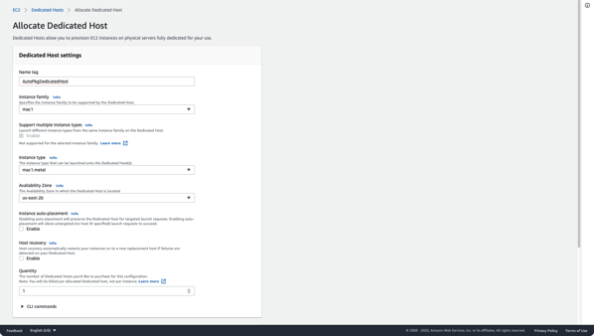
3. Choose Allocate Dedicated Host and then do the following:

Screen Shot 2020 12 18 at 2 58 25 PM

For Name Tag:, give it an appropriate name.

Screen Shot 2020 12 18 at 3 02 02 PM

For Instance family, choose mac1.

Screen Shot 2020 12 18 at 3 30 34 PM

For Support multiple instance types, uncheck the Enable checkbox.

For Instance type, select mac1.metal.

Screen Shot 2020 12 18 at 3 05 35 PM

For Availability Zone, choose the Availability Zone for the Dedicated Host. (For this example, I’m in US-East-2 and I’m choosing us-east-2b.)

Screen Shot 2020 12 18 at 3 30 34 PM

For Instance auto-placement, do not check anything.
For Host recovery, do not check anything.
For Quantity, keep 1.

Screen Shot 2020 12 18 at 3 30 34 PM

Click the Allocate button. (This is the part where Amazon charges you $25.99)

Screen Shot 2020 12 18 at 3 30 57 PM

At this point, the Dedicated Host should be created.

Screen Shot 2020 12 18 at 3 32 58 PM


Setting up a macOS EC2 instance

If you haven’t previously done so, set up an AWS SSH key pair for use with EC2 instances:

https://docs.aws.amazon.com/cli/latest/userguide/cli-services-ec2-keypairs.html

Once your keypair has been created, select the Dedicated Host that you created and then do the following:

Choose Actions, Launch instances onto host.

Screen Shot 2020 12 18 at 5 13 00 PM

Select a macOS AMI. For this example, I’m selecting macOS Catalina 10.15.7.

Screen Shot 2020 12 18 at 5 14 12 PM

Select the mac1.metal instance type.

Screen Shot 2020 12 18 at 5 15 13 PM

Click the Next: Configure Instance Details button.

Screen Shot 2020 12 18 at 5 15 14 PM

On the Configure Instance Details page, verify the following:

Tenancy: Set as dedicated host.


Screen Shot 2020 12 18 at 5 16 17 PM

Host is set as the Dedicated Host you created.

Screen Shot 2020 12 18 at 5 16 17 PM

Update Affinity as needed. Mine is set to Off.

In User Data, I have a script that the Mac EC2 instance can run at boot.

This user data script does the following:

Configures Mac EC2 instance with the following:

  • Account password for the default ec2-user account
  • Set the Mac to auto-login as the default ec2-user account
  • git
  • AutoPkg
  • AutoPkgr
  • JSSImporter

Once these tools and modules are installed, the script configures AutoPkg to use the recipe repos defined in the AutoPkg repos section.

If you want to use this user data script, it’s available from the following address on GitHub:

https://github.com/rtrouton/aws_scripts/tree/master/setup_mac_ec2_instance_for_autopkg

Before adding the user data script to the instance build process, check the variables in the script and verify that they are set up the way you want. There is also an upper limit of 15K in size for this script.

Screen Shot 2020 12 18 at 5 29 46 PM


From there, either copy and paste the script into the available user data blank or select the user data script as a file.

Screen Shot 2020 12 18 at 5 31 12 PM

Double-check your Tenancy, Host and User Data settings to make sure everything is set as desired, then click the Next: Add Storage button.

Screen Shot 2020 12 18 at 5 31 13 PM

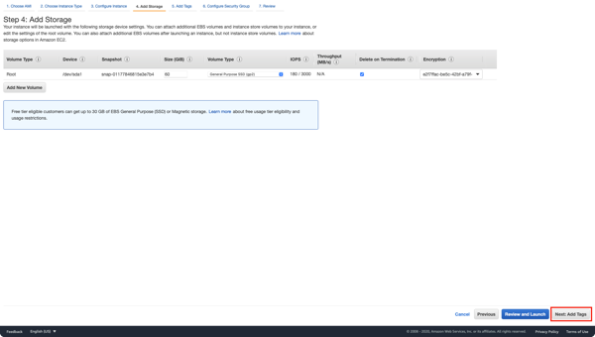
Set how much storage you want. For this example, I’m setting it at 60 GBs of storage.

Screen Shot 2020 12 18 at 5 34 29 PM


Note: Depending on how many AutoPkg recipes you’re running and the size of the installers, you may want to double or even triple the amount of storage I’m setting. Another thing to be aware of is that, the instance’s boot volume will need to be resized to recognize the additional space. If using the user data script linked above, boot volume resizing is included as part of the script’s run.

Once storage is set, click the Next:Add Tags button.

Screen Shot 2020 12 18 at 5 34 30 PM

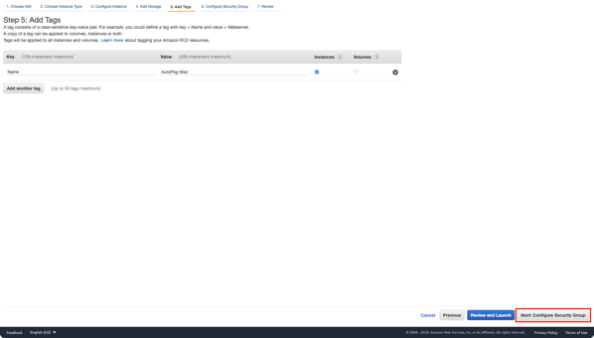
Set tags as desired, then click the Next: Security Group button.

Screen Shot 2020 12 18 at 5 36 07 PM

Choose the options to set a security group as desired.

Screen Shot 2020 12 18 at 5 38 32 PM

If you don’t have a security group available, I recommend creating one and setting it to allow SSH from only your IP address, then click the Review and Launch button.

Screen Shot 2020 12 18 at 5 38 33 PM

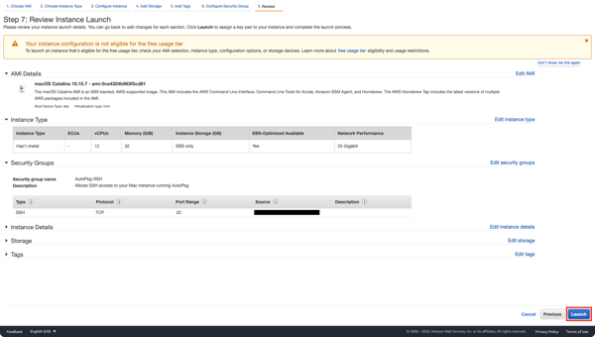
Review your instance’s settings and make sure everything is OK. Once you’re sure, click the Launch button.

Screen Shot 2020 12 18 at 5 39 47 PM

When prompted, select your SSH keypair, then click the Launch instances button.

Screen Shot 2020 12 18 at 5 46 14 PM

Your Mac instance will now launch on the dedicated host. To see if it in the Instances list, click the View instances on host button.

Screen Shot 2020 12 18 at 5 48 07 PM

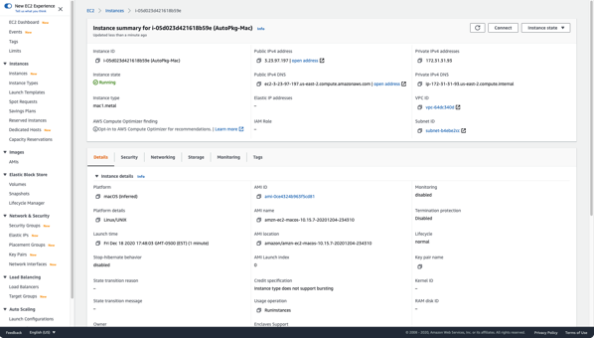
To find out its public DNS address and other useful information, click on the instance ID.

Screen Shot 2020 12 18 at 5 48 32 PM

Screen Shot 2020 12 18 at 5 48 51 PM

Wait about fifteen minutes for your instance to finish setting itself up. After that you should be able to connect to it via SSH and (assuming you configured the right variables for VNC access) also via remote screen sharing.

Connecting to the macOS EC2 instance following setup

Following setup, you can connect to the newly-built EC2 instance via SSH. To do so, open Terminal and use the following SSH command:

ssh -i /path/my-key-pair.pem ec2-user@my-instance-public-dns-name

For example, if your SSH keypair was stored in ~/.ssh and named AutoPkg_SSH_Keypair.pem, you would use the following command to connect to a macOS EC2 instance whose address is ec2-3-23-97-197.us-east-2.compute.amazonaws.com:

ssh -i ~/.ssh/AutoPkg_SSH_Keypair.pem ec2-user@ec2-3-23-97-197.us-east-2.compute.amazonaws.com

No password is needed in this case, as you are using your SSH keypair to authenticate the SSH session.

Screen Shot 2020 12 18 at 9 53 52 PM


To connect via VNC, I recommend setting up VNC to run over an SSH tunnel. The reason for this is that VNC by default does not encrypt its traffic so all network communication between you and the instance (including any passwords) would be sent in the clear. Using an SSH tunnel will allow you to wrap this unencrypted traffic inside SSH’s encryption, which should secure it against third parties.

To set up VNC to run inside an SSH tunnel, you will need to first set up a password for the ec2-user account if you haven’t done so already. You can do this by connecting to the instance via SSH and running the following passwd command:

sudo passwd ec2-user

Screen Shot 2020 12 18 at 9 57 35 PM

Once the command has been run, follow the prompts to change the password. Once the password is set up, run the following SSH command on your end:

ssh -L 5900:localhost:5900 -i /path/my-key-pair.pem ec2-user@my-instance-public-dns-name

For example, if your SSH keypair was stored in ~/.ssh on your Mac and named AutoPkg_SSH_Keypair.pem, you would use the following command to set up an SSH tunnel for VNC between your Mac and a macOS EC2 instance whose address is ec2-3-23-97-197.us-east-2.compute.amazonaws.com:

ssh -L 5900:localhost:5900 -i ~/.ssh/AutoPkg_SSH_Keypair.pem ec2-user@ec2-3-23-97-197.us-east-2.compute.amazonaws.com

Once that’s done, do the following:

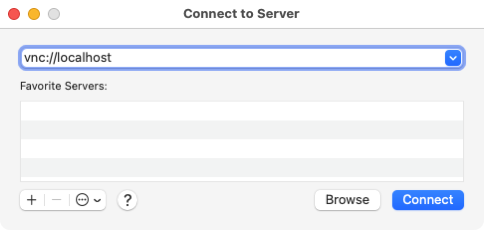
1. Under the Go menu, select Connect to Server.
2. In the Connect to Server window, enter the following:

vnc://localhost:5900

Screen Shot 2020 12 18 at 9 47 35 PM

When prompted, use the following username and password:

Username: ec2-user
Password: Whatever password you defined in the script for the ec2-user account to use.

Screen Shot 2020 12 18 at 9 48 51 PM

Once connected, you’ll be able to work with the Mac instance like you would any other remotely-accessible Mac.

Screen Shot 2020 12 18 at 9 49 33 PM

Screen Shot 2020 12 18 at 9 50 05 PM

In the case of a AutoPkg server built using the user data script I linked to above, you could open AutoPkgr and start setting up your recipes to begin scheduled runs.

Screen Shot 2020 12 18 at 9 50 25 PM

Adobe Flash is dead – let’s get it removed

$
0
0

After 24 years and 1078 known security vulnerabilities, Adobe Flash has reached end of life status as of December 31, 2020.

Screen Shot 2021 01 01 at 1 25 22 PM

To assist with the process of removing Adobe Flash, I’ve written an uninstall script which will completely remove Adobe Flash. For more details, please see below the jump.

This script is designed to uninstall the Adobe Flash plug-ins and their associated components. As part of this, it runs the following actions:

  1. Stop Adobe Flash Install Manager
  2. If running, unload the launchdaemon used by the Adobe Flash update process.
  3. Remove the Adobe Flash plug-ins, Adobe Flash Install Manager and their associated components.
  4. Remove Adobe Flash preference pane settings at the user level.
  5. Forget the installer package receipts.

The script is available below and at the following address on GitHub:

https://github.com/rtrouton/rtrouton_scripts/tree/master/rtrouton_scripts/uninstallers/adobe_flash_uninstall

#!/bin/bash
# This script uninstalls Adobe Flash software
AdobeFlashUninstall (){
echo "Uninstalling Adobe Flash software…"
# kill the Adobe Flash Player Install Manager
echo "Stopping Adobe Flash Install Manager."
killall "Adobe Flash Player Install Manager"
if [[ -f "/Library/LaunchDaemons/com.adobe.fpsaud.plist" ]]; then
echo "Stopping Adobe Flash update process."
/bin/launchctl bootout system "/Library/LaunchDaemons/com.adobe.fpsaud.plist"
fi
if [[ -f "/Library/Application Support/Macromedia/mms.cfg" ]]; then
echo "Deleting Adobe Flash update preferences."
rm "/Library/Application Support/Macromedia/mms.cfg"
fi
if [[ -e "/Library/Application Support/Adobe/Flash Player Install Manager/fpsaud" ]]; then
echo "Deleting Adobe software update app and support files."
rm "/Library/LaunchDaemons/com.adobe.fpsaud.plist"
rm "/Library/Application Support/Adobe/Flash Player Install Manager/FPSAUConfig.xml"
rm "/Library/Application Support/Adobe/Flash Player Install Manager/fpsaud"
fi
if [[ -e "/Library/Internet Plug-Ins/Flash Player.plugin" ]]; then
echo "Deleting NPAPI browser plug-in files."
rm -Rf "/Library/Internet Plug-Ins/Flash Player.plugin"
rm -Rf "/Library/Internet Plug-Ins/Flash Player Enabler.plugin"
rm "/Library/Internet Plug-Ins/flashplayer.xpt"
fi
if [[ -e "/Library/Internet Plug-Ins/PepperFlashPlayer/PepperFlashPlayer.plugin" ]]; then
echo "Deleting PPAPI browser plug-in files."
rm -Rf "/Library/Internet Plug-Ins/PepperFlashPlayer/PepperFlashPlayer.plugin"
rm "/Library/Internet Plug-Ins/PepperFlashPlayer/manifest.json"
fi
if [[ -e "/Library/PreferencePanes/Flash Player.prefPane" ]]; then
echo "Deleting Flash Player preference pane from System Preferences."
rm -Rf "/Library/PreferencePanes/Flash Player.prefPane"
fi
# Removing Adobe Flash preference pane settings at user level
allLocalUsers=$(/usr/bin/dscl . -list /Users UniqueID | awk '$2>500 {print $1}')
for userName in ${allLocalUsers}; do
# get path to user's home directory
userHome=$(/usr/bin/dscl . -read "/Users/$userName" NFSHomeDirectory 2>/dev/null | /usr/bin/sed 's/^[^\/]*//g')
/usr/bin/defaults delete "${userHome}/Library/Preferences/com.apple.systempreferences.plist" com.adobe.preferences.flashplayer 2>/dev/null
done
#Remove receipts
rm -Rf /Library/Receipts/*FlashPlayer*
pkgutil –forget com.adobe.pkg.FlashPlayer >/dev/null 2>&1
pkgutil –forget com.adobe.pkg.PepperFlashPlayer >/dev/null 2>&1
# Remove Adobe Flash Player Install Manager.app
if [[ -e "/Applications/Utilities/Adobe Flash Player Install Manager.app" ]]; then
echo "Deleting the Adobe Flash Player Install Manager app."
rm -Rf "/Applications/Utilities/Adobe Flash Player Install Manager.app"
fi
echo "Uninstall completed successfully."
}
# Set exit error code
ERROR=0
# Check to see if Adobe Flash sofware is installed by locating either the Flash NPAPI or PPAPI browser
# plug-ins in /Library/Internet Plug-Ins or the Adobe Flash Player Install Manager.app in /Applications/Utilities
if [[ -e "/Library/Internet Plug-Ins/Flash Player.plugin" ]] || [[ -e "/Library/Internet Plug-Ins/PepperFlashPlayer/PepperFlashPlayer.plugin" ]] || [[ -e "/Applications/Utilities/Adobe Flash Player Install Manager.app" ]]; then
# Run the Adobe Flash Player software uninstaller
AdobeFlashUninstall
if [[ $? -eq 0 ]]; then
echo "Adobe Flash Player uninstalled successfully."
else
echo "Error: Failed to uninstall Adobe Flash Player software."
ERROR=1
fi
else
echo "Error: Adobe Flash Player software is not installed."
ERROR=1
fi
exit $ERROR

FileVault login screen differences between Intel and Apple Silicon Macs

$
0
0

As new Apple Silicon Macs (ASM) have begun making their way to organizations which use FileVault encryption to secure their fleets, a difference between Intel Macs and ASMs has become apparent.

Intel Macs:

  • Supports account icons and password blanks at the FileVault login screen
  • Unable to support username blanks at the FileVault login screen
  • Unable to support smart cards for login at the FileVault login screen

Screen Shot 2021 01 16 at 5 50 36 PM

ASMs:

  • Supports account icons and password blanks at the FileVault login screen
  • Supports username and password blanks at the FileVault login screen
  • Supports smart cards for login at the FileVault login screen

Screen Shot 2021 01 16 at 6 00 32 PM

Screen Shot 2021 01 16 at 6 13 52 PM

Why the differences between platforms? For more details, please see below the jump.

Intel Macs

On Intel Macs, Apple is dependent on using the EFI login environment for the FileVault 2 login screen. This is a very limited environment in terms of functionality and is used in the FileVault 2 context to provide a way to boot the Mac while the main boot volume is locked by FileVault’s encryption. Once EFI has booted the Mac, the Mac then uses authentication from the user and the tools stored on the not-encrypted Preboot volume to unlock the much-larger encrypted boot volume.

EFI’s limitations mean that only a password blank is truly supported, with Apple having pushed the limits to support correctly matching up multiple account icons with the corresponding multiple account passwords.

Apple Silicon Macs

On ASMs, there is now a unified macOS login experience which includes FileVault logins. For details on this, I recommend checking out the Explore the new system architecture of Apple Silicon Macs session video from WWDC 2020. The explanation is available starting around 20:14.

Screen Shot 2021 01 17 at 11 51 39 AM

On Apple Silicon Macs, macOS has a unified log-in experience. It supports a richer UI with accelerated graphics that is also consistent with macOS look and feel. This experience is made possible by fully booting macOS without requiring the user to unlock the system.

The unified log-in experience allows the introduction of new features even when FileVault is on. For example, it now has built-in support for authentication with CCID and PIV-compatible smart cards, as well as VoiceOver support for accessibility improvements.

In summary, the reason the FileVault login screen is different on ASMs is that Apple no longer needs to use the EFI login environment. Instead, ASMs are able to fully boot macOS while still securing user data within a locked volume which is protected by FileVault.

This is a huge leap forward for ASMs in terms of FileVault login functionality, as there is no longer a login functionality divide between enabling FileVault and not enabling FileVault. As of macOS Big Sur and the M1 ASMs, FileVault logins should now be able to use whichever authentication methods are supported by macOS. More importantly for the future, as native support for new authentication methods are added to the OS, FileVault logins should be able to use them natively as well.

Listing the full OS installers available from Apple’s Software Update feed on macOS Big Sur

$
0
0

One of the changes in macOS Big Sur is that the softwareupdate command has been updated with new functionality.

usage: softwareupdate <cmd> [<args> …]
** Manage Updates:
-l | –list List all appropriate update labels (options: –no-scan, –product-types)
-d | –download Download Only
-i | –install Install
<label> … specific updates
-a | –all All appropriate updates
-R | –restart Automatically restart (or shut down) if required to complete installation.
-r | –recommended Only recommended updates
–list-full-installers List the available macOS Installers
–fetch-full-installer Install the latest recommended macOS Installer
–full-installer-version The version of macOS to install. Ex: –full-installer-version 10.15
–install-rosetta Install Rosetta 2
–background Trigger a background scan and update operation
** Other Tools:
–dump-state Log the internal state of the SU daemon to /var/log/install.log
–evaluate-products Evaluate a list of product keys specified by the –products option
–history Show the install history. By default, only displays updates installed by softwareupdate.
–all Include all processes in history (including App installs)
** Options:
–no-scan Do not scan when listing or installing updates (use available updates previously scanned)
–product-types <type> Limit a scan to a particular product type only – ignoring all others
Ex: –product-types macOS || –product-types macOS,Safari
–products A comma-separated (no spaces) list of product keys to operate on.
–force Force an operation to complete. Use with –background to trigger a background scan regardless of "Automatically check" pref
–agree-to-license Agree to the software license agreement without user interaction.
–verbose Enable verbose output
–help Print this help
view raw gistfile1.txt hosted with ❤ by GitHub

Among the changes is the ability to scan Apple’s Software Update feed and display a list of the currently available full OS installers. To access this list, run the command below with root privileges:

softwareupdate --list-full-installers

The list you receive will be dependent on whether or not your Mac can run a particular OS version. As an example, here’s the list you would receive inside of a VMware VM as of March 3rd, 2021.

Screen Shot 2021 03 03 at 8 26 35 AM

Once you have the right macOS installer identified, you can use the softwareupdate tool to download it.

One thing to be aware of is that multiple versions of a macOS full installer may show up in the Software Update feed. As an example of this, the list above includes multiple entries for macOS 10.15.6 and 10.15.7. These installers would be for hardware-specific builds of that macOS version’s full installer. Unfortunately, it’s not easy to tell the various installers apart using the softwareupdate command because the build number is not included.

If you do need to be able to download an installer with a specific build number, I recommend using the installinstallmacos.py tool. This tool also references the Apple Software Update feed, so the information you get back should be similar but also include the relevant build numbers for the macOS full installers.


Jamf Pro server installer for macOS being retired

$
0
0

As part of the release notes for Jamf Pro 10.28, there is this note in the Deprecations and Removals section:

Support ending for the Jamf Pro Server Installer for macOS — Support for using the Jamf Pro Installer for macOS will be discontinued in a future release. Mac computers with Apple silicon are not supported by the Jamf Pro Installer for macOS. If you want to migrate your Jamf Pro server from macOS to Jamf Cloud, contact Jamf Support. If you want to keep your server on premise, you can migrate your Jamf Pro server from macOS to one of the following servers: Red Hat Enterprise Linux, Ubuntu, or Windows. For more information, see the Migrating to Another Server Knowledge Base article.

Screen Shot 2021 03 17 at 1 55 31 PM

For those folks who are running on-premise Jamf Pro servers on Macs, it looks like it’s time to contact Jamf Support and plan a migration if you haven’t already. As of March 17th, 2021, Jamf’s published support for running Jamf Pro includes the following OS, database and Java versions:

Recommended Configuration:
Operating Systems:
Windows Server 2019
Ubuntu Server 20.04 LTS
Red Hat Enterprise Linux 7.x
macOS 10.15.5
Database software versions:
MySQL 8.0 – InnoDB
Amazon Aurora (MySQL 5.7 compatible)
MySQL 5.7.8 or later – InnoDB
Java version:
OpenJDK 11
Minimum Supported:
Operating Systems:
Windows Server 2016
Windows Server 2012 R2
Ubuntu Server 18.04 LTS
macOS 10.14.5
Database software versions:
MySQL 5.7.8 – InnoDB
MySQL 5.7.8 on Amazon RDS – InnoDB
Java version:
Oracle Java 11
view raw
gistfile1.txt
hosted with ❤ by GitHub

Using Markdown comments to add search keywords to Self Service descriptions

$
0
0

For those using Jamf Pro’s Self Service, one of the handier features can be the Search function built into the app. This search is able to examine Self Service policies and use the information in the policy and Self Service description to populate its search results. For the most part, just the displayed information in the policy should allow Self Service’s search to display relevant policies.

However, you may have a need to force the search process to include policies that would otherwise fall outside of the search parameters. For those who need this ability, thanks to Self Service’s support of Markdown it’s possible to invisibly add search keywords to a Self Service policy description. For more details, please see below the jump.

Markdown is a markup language which uses specific syntax to produce formatted text. In the image below, the left side shows what appears in the Markdown editor and the right side shows how the formatted document would appear.

Screen Shot 2021 04 02 at 4 30 53 PM

Among the syntax options is the ability to add comments using the HTML comment tag. These show up in the Markdown editor, but they don’t show up in the displayed document.

Screen Shot 2021 04 02 at 4 31 54 PM


Since Self Service descriptions only display the formatted text, but the search function can search everything in the description, we can use the comment syntax to add search keywords which Self Service’s search can use but which are invisible to someone looking at the Self Service description via the Self Service app.

To add search keywords, add the syntax tags for Markdown commenting to your Self Service description and add the search keywords you want to use within the tags. An example is shown below:

<!-- Search Keywords Go Here -->

For example, if you wanted to add search keywords like Java and JDK to a Java install policy, you could add the following to your Self Service description:

<!--Java, JDK-->


Screen Shot 2021 04 02 at 4 54 28 PM

Screen Shot 2021 04 02 at 9 07 36 AM


Even if the displayed text in the policy or the Self Service description never mentions either Java or JDK, Self Service’s search will include this policy when you search for those terms.

Screen Shot 2021 04 02 at 9 07 48 AM


Here’s another example, using Backup as a search keyword:

<!--Backup-->


Screen Shot 2021 04 02 at 12 04 38 PM


Screen Shot 2021 04 02 at 9 08 17 AM


Screen Shot 2021 04 02 at 9 08 03 AM


Note: Self Service’s search is case-insensitive so searching for backup or BACKUP when you have Backup as the search keyword should also display the relevant policy or policies.

Using Signing Manager with autopkg-conductor

$
0
0

I’ve recently been working with Twocanoes Software’s Signing Manager in combination with my autopkg-conductor tool for managing AutoPkg runs. I’m happy to report it’s possible, but you may need to make some adjustments to how autopkg-conductor is being launched. For more details, please see below the jump.

As originally written, autopkg-conductor uses a LaunchDaemon to manage when the autopkg-conductor script is run. This was an idea I adopted from AutoPkgr, which also uses a LaunchDaemon to perform AutoPkg runs. The reason for using a LaunchDaemon is that the LaunchDaemon will be able to perform the scheduled AutoPkg run regardless of if the Mac is logged in at the loginwindow or not.

<?xml version="1.0" encoding="UTF-8"?>
<!DOCTYPE plist PUBLIC "-//Apple//DTD PLIST 1.0//EN" "http://www.apple.com/DTDs/PropertyList-1.0.dtd"&gt;
<plist version="1.0">
<dict>
<key>AbandonProcessGroup</key>
<true/>
<key>EnvironmentVariables</key>
<dict>
<key>PATH</key>
<string>/usr/local/bin:/usr/bin:/bin:/usr/sbin:/sbin</string>
</dict>
<key>Label</key>
<string>com.github.autopkg-nightly-run</string>
<key>ProgramArguments</key>
<array>
<string>/usr/local/bin/autopkg-conductor.sh</string>
</array>
<key>RunAtLoad</key>
<false/>
<key>StartCalendarInterval</key>
<array>
<dict>
<key>Hour</key>
<integer>2</integer>
<key>Minute</key>
<integer>0</integer>
</dict>
</array>
<key>UserName</key>
<string>autopkg</string>
</dict>
</plist>

For the most part, this works fine to successfully trigger the autopkg-conductor script. However, a problem occurred once Signing Manager was added to the mix and I tried using it with the PkgSigner AutoPkg processor. The reason for this is that Signing Manager puts credentials into the login keychain and the user context was not correct to access those credentials. Instead, I was seeing errors like this when the LaunchDaemon triggered a run of autopkg-conductor:

productsign: error: Could not find appropriate signing identity for "6116291774E14F3E8A4CB6266F560C07".
JSSImporter can't find a package at '/Users/autopkg/Library/AutoPkg/Cache/local.jss.Postman-AutoUpdate/Postman_Labs_Postman_8.3.1.pkg'!
Failed.
JSSImporter can't find a package at '/Users/autopkg/Library/AutoPkg/Cache/local.jss.Atom-AutoUpdate/GitHub_Atom_1.56.0.pkg'!
Failed.
JSSImporter can't find a package at '/Users/autopkg/Library/AutoPkg/Cache/local.jss.SapMachineJDK11/SAP_SapMachine_11.0.11.pkg'!
Failed.
JSSImporter can't find a package at '/Users/autopkg/Library/AutoPkg/Cache/local.jss.FioriLaunchpad/Fiori_Launchpad_1.0.9.pkg'!
Failed.
JSSImporter can't find a package at '/Users/autopkg/Library/AutoPkg/Cache/local.jss.Code42/Code42_8.6.0.pkg'!
Failed.
JSSImporter can't find a package at '/Users/autopkg/Library/AutoPkg/Cache/local.jss.CitrixWorkspace/Citrix_Workspace_21.04.0.pkg'!
Failed.
JSSImporter can't find a package at '/Users/autopkg/Library/AutoPkg/Cache/local.jss.VMwareFusion/VMware_Fusion_12.1.1.pkg'!
Failed.
JSSImporter can't find a package at '/Users/autopkg/Library/AutoPkg/Cache/local.jss.Slack/Slack_4.16.2.pkg'!
Failed.
JSSImporter can't find a package at '/Users/autopkg/Library/AutoPkg/Cache/local.jss.SAPGUI/SAP_SAPGUI_7.70rev1.pkg'!
Failed.
JSSImporter can't find a package at '/Users/autopkg/Library/AutoPkg/Cache/local.jss.CiscoAnyConnect/Cisco_AnyConnectSecureMobilityClient_4.9.06037.pkg'!
Failed.
JSSImporter can't find a package at '/Users/autopkg/Library/AutoPkg/Cache/local.jss.MURAL/MURAL_1.0.10.pkg'!
Failed.
view raw
gistfile1.txt
hosted with ❤ by GitHub

After Twocanoes Support did some research, they recommended adding the following key to autopkg-conductor‘s LaunchDaemon:

Key: SessionCreate
Value: true

My LaunchDaemon now looked like this:

<?xml version="1.0" encoding="UTF-8"?>
<!DOCTYPE plist PUBLIC "-//Apple//DTD PLIST 1.0//EN" "http://www.apple.com/DTDs/PropertyList-1.0.dtd"&gt;
<plist version="1.0">
<dict>
<key>AbandonProcessGroup</key>
<true/>
<key>EnvironmentVariables</key>
<dict>
<key>PATH</key>
<string>/usr/local/bin:/usr/bin:/bin:/usr/sbin:/sbin</string>
</dict>
<key>Label</key>
<string>com.github.autopkg-nightly-run</string>
<key>ProgramArguments</key>
<array>
<string>/usr/local/bin/autopkg-conductor.sh</string>
</array>
<key>RunAtLoad</key>
<false/>
<key>StartCalendarInterval</key>
<array>
<dict>
<key>Hour</key>
<integer>2</integer>
<key>Minute</key>
<integer>0</integer>
</dict>
</array>
<key>UserName</key>
<string>autopkg</string>
<key>SessionCreate</key>
<true/>
</dict>
</plist>
view raw
gistfile1.txt
hosted with ❤ by GitHub

With renewed hope, I used the LaunchDaemon to trigger a run. Same errors:

productsign: error: Could not find appropriate signing identity for "6116291774E14F3E8A4CB6266F560C07".
JSSImporter can't find a package at '/Users/autopkg/Library/AutoPkg/Cache/local.jss.Postman-AutoUpdate/Postman_Labs_Postman_8.3.1.pkg'!
Failed.
JSSImporter can't find a package at '/Users/autopkg/Library/AutoPkg/Cache/local.jss.Atom-AutoUpdate/GitHub_Atom_1.56.0.pkg'!
Failed.
JSSImporter can't find a package at '/Users/autopkg/Library/AutoPkg/Cache/local.jss.SapMachineJDK11/SAP_SapMachine_11.0.11.pkg'!
Failed.
JSSImporter can't find a package at '/Users/autopkg/Library/AutoPkg/Cache/local.jss.FioriLaunchpad/Fiori_Launchpad_1.0.9.pkg'!
Failed.
JSSImporter can't find a package at '/Users/autopkg/Library/AutoPkg/Cache/local.jss.Code42/Code42_8.6.0.pkg'!
Failed.
JSSImporter can't find a package at '/Users/autopkg/Library/AutoPkg/Cache/local.jss.CitrixWorkspace/Citrix_Workspace_21.04.0.pkg'!
Failed.
JSSImporter can't find a package at '/Users/autopkg/Library/AutoPkg/Cache/local.jss.VMwareFusion/VMware_Fusion_12.1.1.pkg'!
Failed.
JSSImporter can't find a package at '/Users/autopkg/Library/AutoPkg/Cache/local.jss.Slack/Slack_4.16.2.pkg'!
Failed.
JSSImporter can't find a package at '/Users/autopkg/Library/AutoPkg/Cache/local.jss.SAPGUI/SAP_SAPGUI_7.70rev1.pkg'!
Failed.
JSSImporter can't find a package at '/Users/autopkg/Library/AutoPkg/Cache/local.jss.CiscoAnyConnect/Cisco_AnyConnectSecureMobilityClient_4.9.06037.pkg'!
Failed.
JSSImporter can't find a package at '/Users/autopkg/Library/AutoPkg/Cache/local.jss.MURAL/MURAL_1.0.10.pkg'!
Failed.
view raw
gistfile1.txt
hosted with ❤ by GitHub

This was clearly a case of context. I was running as the right user, but something about the session context wasn’t quite right to allow me access to the login keychain and access the Signing Manager credential.

After some additional research, Twocanoes Support recommended the following:

  1. Have the user account be logged in at the login window (as opposed to running logged out.)
  2. Replace the LaunchDaemon with a LaunchAgent.

I then unloaded the LaunchDaemon and replaced it with a practically identical LaunchAgent, with the two following keys removed:

Key: UserName
Value: Account which I was running AutoPkg from (in this case, the user account was named autopkg)

Key: SessionCreate
Value: true

The LaunchAgent appeared as shown below:

<?xml version="1.0" encoding="UTF-8"?>
<!DOCTYPE plist PUBLIC "-//Apple//DTD PLIST 1.0//EN" "http://www.apple.com/DTDs/PropertyList-1.0.dtd"&gt;
<plist version="1.0">
<dict>
<key>AbandonProcessGroup</key>
<true/>
<key>EnvironmentVariables</key>
<dict>
<key>PATH</key>
<string>/usr/local/bin:/usr/bin:/bin:/usr/sbin:/sbin</string>
</dict>
<key>Label</key>
<string>com.github.autopkg-nightly-run</string>
<key>ProgramArguments</key>
<array>
<string>/usr/local/bin/autopkg-conductor.sh</string>
</array>
<key>RunAtLoad</key>
<false/>
<key>StartCalendarInterval</key>
<array>
<dict>
<key>Hour</key>
<integer>2</integer>
<key>Minute</key>
<integer>0</integer>
</dict>
</array>
</dict>
</plist>
view raw
gistfile1.txt
hosted with ❤ by GitHub

To test it out, I changed the following value in the LaunchAgent:

Key: RunAtLoad

From: false
To: true

After making that change, I logged out, logged in and * bang * my AutoPkg runs started being able to access the signing identity provided by Signing Manager and sign my packages using the PkgSigner AutoPkg processor.

productsign: using timestamp authority for signature
productsign: signing product with identity "Developer ID Installer: Rich Trouton (XF95CST45F)" from keychain (null)
productsign: adding certificate "Developer ID Certification Authority"
productsign: adding certificate "Apple Root CA"
productsign: Wrote signed product archive to /Users/ec2-user/Library/AutoPkg/Cache/local.jss.Postman-AutoUpdate/Postman_Labs_Postman_8.3.1.pkg
productsign: using timestamp authority for signature
productsign: signing product with identity "Developer ID Installer: Rich Trouton (XF95CST45F)" from keychain (null)
productsign: adding certificate "Developer ID Certification Authority"
productsign: adding certificate "Apple Root CA"
productsign: Wrote signed product archive to /Users/autopkg/Library/AutoPkg/Cache/local.jss.Atom-AutoUpdate/GitHub_Atom_1.56.0.pkg
productsign: using timestamp authority for signature
productsign: signing product with identity "Developer ID Installer: Rich Trouton (XF95CST45F)" from keychain (null)
productsign: adding certificate "Developer ID Certification Authority"
productsign: adding certificate "Apple Root CA"
productsign: Wrote signed product archive to /Users/autopkg/Library/AutoPkg/Cache/local.jss.SapMachineJDK11/SAP_SapMachine_11.0.11.pkg
productsign: using timestamp authority for signature
productsign: signing product with identity "Developer ID Installer: Rich Trouton (XF95CST45F)" from keychain (null)
productsign: adding certificate "Developer ID Certification Authority"
productsign: adding certificate "Apple Root CA"
productsign: Wrote signed product archive to /Users/autopkg/Library/AutoPkg/Cache/local.jss.FioriLaunchpad/Fiori_Launchpad_1.0.9.pkg
productsign: using timestamp authority for signature
productsign: signing product with identity "Developer ID Installer: Rich Trouton (XF95CST45F)" from keychain (null)
productsign: adding certificate "Developer ID Certification Authority"
productsign: adding certificate "Apple Root CA"
productsign: Wrote signed product archive to /Users/autopkg/Library/AutoPkg/Cache/local.jss.Code42/Code42_8.6.0.pkg
productsign: using timestamp authority for signature
productsign: signing product with identity "Developer ID Installer: Rich Trouton (XF95CST45F)" from keychain (null)
productsign: adding certificate "Developer ID Certification Authority"
productsign: adding certificate "Apple Root CA"
productsign: Wrote signed product archive to /Users/autopkg/Library/AutoPkg/Cache/local.jss.CitrixWorkspace/Citrix_Workspace_21.04.0.pkg
productsign: using timestamp authority for signature
productsign: signing product with identity "Developer ID Installer: Rich Trouton (XF95CST45F)" from keychain (null)
productsign: adding certificate "Developer ID Certification Authority"
productsign: adding certificate "Apple Root CA"
productsign: Wrote signed product archive to /Users/autopkg/Library/AutoPkg/Cache/local.jss.VMwareFusion/VMware_Fusion_12.1.1.pkg
productsign: using timestamp authority for signature
productsign: signing product with identity "Developer ID Installer: Rich Trouton (XF95CST45F)" from keychain (null)
productsign: adding certificate "Developer ID Certification Authority"
productsign: adding certificate "Apple Root CA"
productsign: Wrote signed product archive to /Users/autopkg/Library/AutoPkg/Cache/local.jss.Slack/Slack_4.16.2.pkg
productsign: using timestamp authority for signature
productsign: signing product with identity "Developer ID Installer: Rich Trouton (XF95CST45F)" from keychain (null)
productsign: adding certificate "Developer ID Certification Authority"
productsign: adding certificate "Apple Root CA"
productsign: Wrote signed product archive to /Users/autopkg/Library/AutoPkg/Cache/local.jss.SAPGUI/SAP_SAPGUI_7.70rev1.pkg
productsign: using timestamp authority for signature
productsign: signing product with identity "Developer ID Installer: Rich Trouton (XF95CST45F)" from keychain (null)
productsign: adding certificate "Developer ID Certification Authority"
productsign: adding certificate "Apple Root CA"
productsign: Wrote signed product archive to /Users/autopkg/Library/AutoPkg/Cache/local.jss.CiscoAnyConnect/Cisco_AnyConnectSecureMobilityClient_4.9.06037.pkg
productsign: using timestamp authority for signature
productsign: signing product with identity "Developer ID Installer: Rich Trouton (XF95CST45F)" from keychain (null)
productsign: adding certificate "Developer ID Certification Authority"
productsign: adding certificate "Apple Root CA"
productsign: Wrote signed product archive to /Users/autopkg/Library/AutoPkg/Cache/local.jss.MURAL/MURAL_1.0.10.pkg
view raw
gistfile1.txt
hosted with ❤ by GitHub

Once my testing was completed, I changed the RunAtLoad key’s value back to false.

Transitioning from a LaunchDaemon to a LaunchAgent does mean I will need to leave the account I’m using for AutoPkg logged in at the login window, which has security implications to consider carefully.

In my particular case, AutoPkg is being run on a virtual machine where there is not a physical display attached and access to screen sharing is restricted, so for my particular case my opinion is that the trade-off is worth it.

With regards to Signing Manager’s operation, I also had some additional questions about it with regards to my AutoPkg runs which got answered during testing:

  • Question: Does the Signing Manager app need to be launched, or will productsign (used by the AutoPkg PkgSigner processor) be able to get the certificate without the app being launched?
  • Answer: After configuring Signing Manager, there’s no need to launch the app. As long as productsign is given the right signing identity (which Signing Manager refers to as a “fingerprint”), signing will work.
  • Question: If you need to reboot your Mac, do you need to do anything following the reboot in order to having signing work?
  • Answer: No

Using curl for telnet testing on macOS High Sierra and later

$
0
0

As part of introducing macOS High Sierra, Apple removed the telnet tool from macOS. This was part of Apple’s overall effort to improve security, as telnet does not use encryption and its traffic can be intercepted and read. However, telnet did (and does) serve a useful function as a quick way to check if it is possible to connect to a remote server on a particular port.

While there are alternative tools available for this task (like netcat), it’s also possible to still create a telnet connection on macOS using another tool: curl

For more details, please see below the jump.

You can use curl to create a telnet connection using a command similar to the one shown below:

curl -v telnet://ip.address.here:port.number.here

Note: You can also use a DNS address in place of ip.address.here.

For example, if you want to check if https://www.yahoo.com is responding on port 443, use the curl command shown below:

curl -v telnet://www.yahoo.com:443

You should see output similar to that shown below:

username@computername ~ % curl -v telnet://www.yahoo.com:443
* Trying 74.6.143.26...
* TCP_NODELAY set
* Connected to www.yahoo.com (74.6.143.26) port 443 (#0)
^C
username@computername ~ %

Note: Once successfully connected, use Control+C to break the telnet connection.

If the port is not open, you should see different output. For example, if you want to check if http://www.yahoo.com is responding on port 444, use the curl command shown below:

curl -v telnet://www.yahoo.com:444

Port 444 is not open, so you should see output similar to that shown below:

username@computername ~ % curl -v telnet://www.yahoo.com:444
* Trying 74.6.143.26...
* TCP_NODELAY set
* connect to 74.6.143.26 port 444 failed: Connection refused
* Trying 74.6.143.25...
* TCP_NODELAY set
* connect to 74.6.143.25 port 444 failed: Connection refused
* Failed to connect to www.yahoo.com port 444: Connection refused
* Closing connection 0
curl: (7) Failed to connect to www.yahoo.com port 444: Connection refused
username@computername ~ %

Using the Jamf Pro API to send device lock commands via MDM to multiple Macs

$
0
0

Most Mac admins have had this conversation at one point or another over the course of their careers:

“$Very Important Person left their Mac behind in a cab! What do we do?”
“OK, no worries. We can send a command to lock the computer or have it erase itself. Do you want it locked or wiped?”

At that point, the admin pulls up their MDM admin console and depending on what the response was (lock or wipe), send out the appropriate MDM command accompanied by a PIN code. Once received, the Mac will then turn itself into a paperweight which does or doesn’t erase itself.

Doing these one at a time is a pretty straightforward process. For example, here’s how it looks in Jamf Pro to send a device lock command via MDM:

1. Log into Jamf Pro using an account which can send lock commands via MDM.
2. Go to the appropriate computer inventory record.

Screen Shot 2021 05 28 at 2 48 00 PM

3. Select the Management tab.

Screen Shot 2021 05 28 at 2 48 01 PM

4. In the Management Commands section of the Management tab, click the Lock Computer button.

Screen Shot 2021 05 28 at 1 57 43 PM

5. Enter the PIN code which will later be used to unlock the Mac. If desired, you can also enter a message which will appear on the lock screen.

Screen Shot 2021 05 28 at 1 58 56 PM

6. Click the Lock Computer button.

Screen Shot 2021 05 28 at 1 58 57 PM

7. Click the OK button in the confirmation window.

Screen Shot 2021 05 28 at 1 59 42 PM


Once the device lock command has been sent, the Lock Computer button’s text should temporarily change to Command Sent.

Screen Shot 2021 05 28 at 1 59 49 PM


For a small number of machines (10 or less), the method outlined above works fine. But once you get beyond that number, this process gets time-consuming and unwieldy. Fortunately, there is also a way to use the Jamf Pro Classic API to send device lock commands. For more details, please see below the jump.

Pre-requisites:

If setting up a specific Jamf Pro user account for this purpose with limited rights, here are the required API privileges for the account on the Jamf Pro server:

Jamf Pro Server Objects:

Computers: Create

Jamf Pro Server Action:

Send Computer Remote Lock Command

Once you have your Jamf Pro account credentials handled, you can use an API command similar to the one shown below to send a device lock command (referred to in Apple’s MDM documentation as DeviceLock.)


/usr/bin/curl -su username_here:password_here https://jamf.pro.server.address.here:port_here/JSSResource/computercommands/command/DeviceLock/passcode/PIN_code_goes_here/id/Jamf_Pro_Computer_ID_goes_here -H "Content-Type: application/xml" -X POST

For example, here’s the command used to lock a Jamf Pro-enrolled Mac with the following Jamf Pro server, Jamf Pro account with the necessary privileges, Jamf Pro computer ID and desired PIN code.


/usr/bin/curl -su mdmlock:correct_horse_Battery_Staple https://jamfpro.company.com:8443/JSSResource/computercommands/command/DeviceLock/passcode/123456/id/9345 -H "Content-Type: application/xml" -X POST


Note: Using the API to send lock commands does have a limitation, where it is not possible to include a message to appear on the lock screen. If a message must appear on the lock screen, I recommend using the method described earlier for sending lock commands from the computer inventory record in the Jamf Pro admin console.

To help make the task of sending MDM lock commands easier, I’ve written a script which uses the API command above to read input from a .csv file and use that information to send device lock commands to multiple Macs. This script reads a .csv file formatted as follows:

Jamf Pro ID, PIN Code” as the first line

Subsequent lines:
Column 1: A Mac’s Jamf Pro ID
Column 2: Device Lock PIN code


Jamf Pro ID PIN Code
26 165234
52 197898
1226 201145
view raw
mdmlock.csv
hosted with ❤ by GitHub

For authentication, the script can accept manual input or values stored in a ~/Library/Preferences/com.github.jamfpro-info.plist file.

The plist file can be created by running the following commands and substituting your own values where appropriate:

To store the Jamf Pro URL in the plist file:

defaults write com.github.jamfpro-info jamfpro_url https://jamf.pro.server.goes.here:port_number_goes_here

To store the account username in the plist file:

defaults write com.github.jamfpro-info jamfpro_user account_username_goes_here

To store the account password in the plist file:

defaults write com.github.jamfpro-info jamfpro_password account_password_goes_here

Once you have authentication handled, the script is designed to run as shown below:

/path/to/Jamf_Pro_MDM_Device_Lock.sh /path/to/filename_goes_here.csv

Once executed, the script will then do the following:

  1. Skip the first line of the .csv file (this is the “Jamf Pro ID, PIN Code” line.)
  2. Read each subsequent line of the .csv one at a time and assign the values of column 1 and column 2 to separate variables.
  3. Use the variables in an API POST call to identify a Jamf Pro computer inventory record using the Jamf Pro ID listed in the .csv file and lock the Mac in question using the PIN code listed in the .csv file.

A successful MDM lock should produce output similar to that shown below:


Attempting to send MDM lock to Jamf Pro ID 2935 with PIN code 348202.
<?xml version="1.0" encoding="UTF-8"?><computer_command><command><name>DeviceLock</name><command_uuid>98d915a4-6132-4535-b474-c8381e48425a</command_uuid><computer_id>2935</computer_id></command></computer_command>
Successfully locked computer with Jamf Pro ID 1925 with PIN code 348202.
view raw
gistfile1.txt
hosted with ❤ by GitHub

Failures should look similar to this:

Attempting to send MDM lock to Jamf Pro ID 1234567890 with PIN code 348201.

ERROR! MDM lock of computer with Jamf Pro ID 1234567890 failed.
Attempting to send MDM lock to Jamf Pro ID 29352935 with PIN code 12345.

Invalid PIN code data provided: 12345
Attempting to send MDM lock to Jamf Pro ID AA2319 with PIN code 348206.

Invalid Jamf Pro ID data provided: AA2319


username@computername ~ % /path/to/Jamf_Pro_MDM_Device_Lock.sh filename_goes_here.csv
Attempting to send MDM lock to Jamf Pro ID 1234567890 with PIN code 348201.
ERROR! MDM lock of computer with Jamf Pro ID 1234567890 failed.
Attempting to send MDM lock to Jamf Pro ID 2935 with PIN code 348202.
<?xml version="1.0" encoding="UTF-8"?><computer_command><command><name>DeviceLock</name><command_uuid>98d915a4-6132-4535-b474-c8381e48425a</command_uuid><computer_id>2935</computer_id></command></computer_command>
Successfully locked computer with Jamf Pro ID 1925 with PIN code 348202.
Attempting to send MDM lock to Jamf Pro ID 29352935 with PIN code 12345.
Invalid PIN code data provided: 12345
Attempting to send MDM lock to Jamf Pro ID AA2319 with PIN code 348206.
Invalid Jamf Pro ID data provided: AA2319
username@computername ~ %
view raw
gistfile1.txt
hosted with ❤ by GitHub


This script is available below and also from GitHub at the following location:

https://github.com/rtrouton/rtrouton_scripts/tree/main/rtrouton_scripts/Casper_Scripts/Jamf_Pro_MDM_Device_Lock

#!/bin/bash
# Sends MDM lock commands using Jamf Pro's Classic API.
#
# This script reads a .csv file formatted as follows:
#
# "Jamf Pro ID, PIN Code" as the first line
#
# Subsequent lines:
# Column 1: A Mac's Jamf Pro ID
# Column 2: Device Lock PIN code
#
# Example:
#
# Jamf Pro ID, PIN Code
# 26,165234
# 52,197898
# 1226,201145
#
# This script is designed to run as shown below:
#
# /path/to/Jamf_Pro_MDM_Device_Lock.sh filename_goes_here.csv
#
# Once executed, the script will then do the following:
#
# Skip the first line of the .csv file (this is the "Jamf Pro ID, PIN Code" line.)
# Read each subsequent line of the .csv one at a time and assign the values of column 1
# and column 2 to separate variables.
#
# Use the variables in an API PUT call to identify a Jamf Pro computer inventory record
# using the Jamf Pro ID listed in the .csv file and lock the Mac in question using the
# the PIN code listed in the .csv file.
#
# A successful MDM lock should produce output similar to that shown below:
#
# Attempting to send MDM lock to Jamf Pro ID 1925 with PIN code 348202.
# <?xml version="1.0" encoding="UTF-8"?><computer_command><command><name>DeviceLock</name><command_uuid>98d915a4-6132-4535-b474-c8381e48425a</command_uuid><computer_id>1925</computer_id></command></computer_command>
# Successfully locked computer with Jamf Pro ID 1925 with PIN code 348202.
#
# Failures should look similar to this:
#
# Attempting to send MDM lock to Jamf Pro ID 1234567890 with PIN code 348201.
#
# ERROR! MDM lock of computer with Jamf Pro ID 1234567890 failed.
#
# Attempting to send MDM lock to Jamf Pro ID 19251925 with PIN code 12345.
#
# Invalid PIN code data provided: 12345
#
# Attempting to send MDM lock to Jamf Pro ID AA2319 with PIN code 348206.
#
# Invalid Jamf Pro ID data provided: AA2319
#
# If setting up a specific user account with limited rights, here are the required API privileges
# for the account on the Jamf Pro server:
#
# Jamf Pro Server Objects:
#
# Computers: Create
#
# Jamf Pro Server Action:
#
# Send Computer Remote Lock Command
# If you choose to hardcode API information into the script, set one or more of the following values:
#
# The username for an account on the Jamf Pro server with sufficient API privileges
# The password for the account
# The Jamf Pro URL
# Set the Jamf Pro URL here if you want it hardcoded.
jamfpro_url=""
# Set the username here if you want it hardcoded.
jamfpro_user=""
# Set the password here if you want it hardcoded.
jamfpro_password=""
# If you do not want to hardcode API information into the script, you can also store
# these values in a ~/Library/Preferences/com.github.jamfpro-info.plist file.
#
# To create the file and set the values, run the following commands and substitute
# your own values where appropriate:
#
# To store the Jamf Pro URL in the plist file:
# defaults write com.github.jamfpro-info jamfpro_url https://jamf.pro.server.goes.here:port_number_goes_here
#
# To store the account username in the plist file:
# defaults write com.github.jamfpro-info jamfpro_user account_username_goes_here
#
# To store the account password in the plist file:
# defaults write com.github.jamfpro-info jamfpro_password account_password_goes_here
#
# If the com.github.jamfpro-info.plist file is available, the script will read in the
# relevant information from the plist file.
jamfpro_plist="$HOME/Library/Preferences/com.github.jamfpro-info.plist"
filename="$1"
exitCode=0
if [[ -r "$jamfpro_plist" ]]; then
if [[ -z "$jamfpro_url" ]]; then
jamfpro_url=$(defaults read "${jamfpro_plist%.*}" jamfpro_url)
fi
if [[ -z "$jamfpro_user" ]]; then
jamfpro_user=$(defaults read "${jamfpro_plist%.*}" jamfpro_user)
fi
if [[ -z "$jamfpro_password" ]]; then
jamfpro_password=$(defaults read "${jamfpro_plist%.*}" jamfpro_password)
fi
fi
# If the Jamf Pro URL, the account username or the account password aren't available
# otherwise, you will be prompted to enter the requested URL or account credentials.
if [[ -z "$jamfpro_url" ]]; then
read -p "Please enter your Jamf Pro server URL : " jamfpro_url
fi
if [[ -z "$jamfpro_user" ]]; then
read -p "Please enter your Jamf Pro user account : " jamfpro_user
fi
if [[ -z "$jamfpro_password" ]]; then
read -p "Please enter the password for the $jamfpro_user account: " -s jamfpro_password
fi
echo
# Remove the trailing slash from the Jamf Pro URL if needed.
jamfpro_url=${jamfpro_url%%/}
# Verify that the file exists and is readable
if [[ -r $filename ]]; then
# Set IFS to read the .csv file by setting commas as the character
# which separates fields in the .csv file
while IFS=, read jamf_pro_id pin_code || [ -n "$jamf_pro_id" ]; do
echo "Attempting to send MDM lock to Jamf Pro ID $jamf_pro_id with PIN code $pin_code."
# All Jamf Pro IDs should be positive numbers and
# PIN codes should be all positive numbers that are
# exactly six digits, so we check for those conditions
# before proceeding.
if [[ "$jamf_pro_id" =~ ^[0-9]+$ ]]; then
if [[ "$pin_code" =~ ^[0-9]{6} ]]; then
# Due to IFS redefining field separation, the $pin_code
# value has a carriage return included. The next check
# below trims that off before it can cause problems for curl.
pin_code=$(echo $pin_code | tr -d '\r')
# If the previous checks succeeded, the curl command below
# sends the DeviceLock command, which will then be sent out
# by the Jamf Pro server. The curl command uses the "–fail"
# function to enable curl to send out an exit code, which we
# use to test if the API call was successful.
/usr/bin/curl –fail -su ${jamfpro_user}:${jamfpro_password} "$jamfpro_url/JSSResource/computercommands/command/DeviceLock/passcode/$pin_code/id/$jamf_pro_id" -H "Content-Type: application/xml" -X POST
# curl's exit status is checked below. If curl has an exit status of zero,
# the API call was sent and received successfully. If curl has a non-zero
# exit status, a warning message is displayed which indicates that the API call
# has failed.
if [[ $? -eq 0 ]]; then
echo -e "\nSuccessfully locked computer with Jamf Pro ID $jamf_pro_id with PIN code $pin_code."
else
echo -e "\nERROR! MDM lock of computer with Jamf Pro ID $jamf_pro_id failed."
fi
# If the PIN code is not all positive numbers
# and exactly six digits, a warning message is
# displayed that an invalid PIN code has been
# provided.
else
echo -e "\nInvalid PIN code provided: $pin_code"
fi
# If the Jamf Pro ID number is not all positive numbers,
# a warning message is displayed that an invalid Jamf Pro ID number
# has been provided.
else
echo -e "\nInvalid Jamf Pro ID provided: $jamf_pro_id"
fi
echo ""
done < <(tail -n +2 "$filename")
else
# If the provided .csv is not readable, a warning message
# is displayed that the file does not exist or is not readable.
echo "Input file does not exist or is not readable"
exitCode=1
fi
exit "$exitCode"

Updated Jamf Pro MDM lock script to add reporting feature

$
0
0

Previously, I’d written a script to manage sending device lock commands using the Jamf Pro Classic API. After writing it, I thought that it would be a good idea if the script could also generate a report that could be handed off to others so I forked the script and updated it to generate a report in .tsv format. Since others might prefer the original script without the automatically generated report, I left that one alone and have made the forked copy into its own script. For more details, please see below the jump.

Pre-requisites:

If setting up a specific Jamf Pro user account for this purpose with limited rights, here are the required API privileges for the account on the Jamf Pro server:

Jamf Pro Server Objects:

Computers: Create, Read

Jamf Pro Server Action:

Send Computer Remote Lock Command

This script reads a .csv file formatted as follows:

Jamf Pro ID, PIN Code” as the first line

Subsequent lines:
Column 1: A Mac’s Jamf Pro ID
Column 2: Device Lock PIN code


Jamf Pro ID PIN Code
26 165234
52 197898
1226 201145
view raw
mdmlock.csv
hosted with ❤ by GitHub

For authentication, the script can accept manual input or values stored in a ~/Library/Preferences/com.github.jamfpro-info.plist file.

The plist file can be created by running the following commands and substituting your own values where appropriate:

To store the Jamf Pro URL in the plist file:

defaults write com.github.jamfpro-info jamfpro_url https://jamf.pro.server.goes.here:port_number_goes_here

To store the account username in the plist file:

defaults write com.github.jamfpro-info jamfpro_user account_username_goes_here

To store the account password in the plist file:

defaults write com.github.jamfpro-info jamfpro_password account_password_goes_here

Once you have authentication handled, the script is designed to run as shown below:

/path/to/Jamf_Pro_MDM_Device_Lock.sh /path/to/filename_goes_here.csv

Once executed, the script will then do the following:

Skip the first line of the .csv file (this is the “Jamf Pro ID, PIN Code” line.)
Read each subsequent line of the .csv one at a time and assign the values of column 1
and column 2 to separate variables.

Use the variables in an API POST call to identify a Jamf Pro computer inventory record using the Jamf Pro ID listed in the .csv file and lock the Mac in question using the the PIN code listed in the .csv file.

A successful MDM lock should produce output similar to that shown below:

Attempting to send MDM lock to Jamf Pro ID 2935 with PIN code 348202.
<?xml version="1.0" encoding="UTF-8"?><computer_command><command><name>DeviceLock</name><command_uuid>98d915a4-6132-4535-b474-c8381e48425a</command_uuid><computer_id>2935</computer_id></command></computer_command>
Successfully locked computer with Jamf Pro ID 1925 with PIN code 348202.
view raw
gistfile1.txt
hosted with ❤ by GitHub

Failures should look similar to this:

Attempting to send MDM lock to Jamf Pro ID 1234567890 with PIN code 348201.

ERROR! MDM lock of computer with Jamf Pro ID 1234567890 failed.


Attempting to send MDM lock to Jamf Pro ID 29352935 with PIN code 12345.

Invalid PIN code data provided: 12345


Attempting to send MDM lock to Jamf Pro ID AA2319 with PIN code 348206.

Invalid Jamf Pro ID data provided: AA2319


username@computername ~ % /path/to/Jamf_Pro_MDM_Device_Lock_with_Report.sh /path/to/filename.csv
Please enter your Jamf Pro server URL : https://jamf.pro.server.here
Please enter your Jamf Pro user account : username_goes_here
Please enter the password for the username_goes_here account:
Attempting to send MDM lock to Jamf Pro ID 1234567890 with PIN code 348201.
ERROR! MDM lock of computer with Jamf Pro ID 1234567890 failed.
Attempting to send MDM lock to Jamf Pro ID 2935 with PIN code 348202.
<?xml version="1.0" encoding="UTF-8"?><computer_command><command><name>DeviceLock</name><command_uuid>ee3aa1de-cb8d-482e-84f3-384ad8ce6754</command_uuid><computer_id>2935</computer_id></command></computer_command>
Successfully locked computer with Jamf Pro ID 2935 with PIN code 348202.
Attempting to send MDM lock to Jamf Pro ID 29352935 with PIN code 12345.
Invalid PIN code provided: 12345
Attempting to send MDM lock to Jamf Pro ID 9876543210 with PIN code 348203.
ERROR! MDM lock of computer with Jamf Pro ID 9876543210 failed.
Attempting to send MDM lock to Jamf Pro ID AA2319 with PIN code 348206.
Invalid Jamf Pro ID provided: AA2319
Report on Macs available here: /var/folders/wz/mp27mjl97h505nvff787hh3c0000gn/T/tmp.myASwMzm.tsv
username@computername ~ %
view raw
gistfile1.txt
hosted with ❤ by GitHub


This script will also automatically generate a report in .tsv format with information similar to what’s shown below:


Jamf Pro ID Number Make Model Serial Number UDID Jamf Pro URL MDM Lock Successful
10734 Apple MacBook Pro (13-inch, 2018) C02TW0WAHX87 60471C6E-02D6-56C5-91AE-5E73868ADA08 https://jamf.pro.server.here/computers.html?id=30734 Yes
858 Apple MacBook Pro (13-inch, 2018) C027251024N23 209B8A69-CCA1-5F31-B415-A929019673D8 https://jamf.pro.server.here/computers.html?id=31858 No
421 Apple MacBook Pro (13-inch, 2018) Q027251024R23 EFAA3D9C-A53A-551E-B9C5-FAEFD77A4F58 https://jamf.pro.server.here/computers.html?id=32421 Yes
1217 Apple MacBook Pro (13-inch, 2018) C02F0U5WAHX54 C47E3AAC-0D4A-566F-8820-EAC94732739D https://jamf.pro.server.here/computers.html?id=31217 Yes

This script is available below and also from GitHub at the following location:

https://github.com/rtrouton/rtrouton_scripts/tree/main/rtrouton_scripts/Casper_Scripts/Jamf_Pro_MDM_Device_Lock_with_Report

#!/bin/bash
# Sends MDM lock commands using Jamf Pro's Classic API.
# This script reads a .csv file formatted as follows:
#
# "Jamf Pro ID, PIN Code" as the first line
#
# Subsequent lines:
# Column 1: A Mac's Jamf Pro ID
# Column 2: Device Lock PIN code
#
# Example:
#
# Jamf Pro ID, PIN Code
# 26,165234
# 52,197898
# 1226,201145
#
# This script is designed to run as shown below:
#
# /path/to/Jamf_Pro_MDM_Device_Lock_with_Report.sh /path/to/filename_goes_here.csv
#
# Once executed, the script will then do the following:
#
# Skip the first line of the .csv file (this is the "Jamf Pro ID, PIN Code" line.)
# Read each subsequent line of the .csv one at a time and assign the values of column 1
# and column 2 to separate variables.
#
# Use the variables in an API PUT call to identify a Jamf Pro computer inventory record
# using the Jamf Pro ID listed in the .csv file and lock the Mac in question using the
# the PIN code listed in the .csv file.
#
# A successful MDM lock should produce output similar to that shown below:
#
# Attempting to send MDM lock to Jamf Pro ID 2935 with PIN code 348202.
# <?xml version="1.0" encoding="UTF-8"?><computer_command><command><name>DeviceLock</name><command_uuid>98d915a4-6132-4535-b474-c8381e48425a</command_uuid><computer_id>2935</computer_id></command></computer_command>
# Successfully locked computer with Jamf Pro ID 2935 with PIN code 348202.
#
# Failures should look similar to this:
#
# Attempting to send MDM lock to Jamf Pro ID 1234567890 with PIN code 348201.
#
# ERROR! MDM lock of computer with Jamf Pro ID 1234567890 failed.
#
# Attempting to send MDM lock to Jamf Pro ID 29352935 with PIN code 12345.
#
# Invalid PIN code data provided: 12345
#
# Attempting to send MDM lock to Jamf Pro ID AA2319 with PIN code 348206.
#
# Invalid Jamf Pro ID data provided: AA2319
#
# This script will also generate a report in .tsv format with information similar to what's shown below:
#
#
# |Jamf Pro ID Number|Make |Model |Serial Number|UDID |Jamf Pro URL |MDM Lock Successful|
# |——————|—–|—————————|————-|————————————|———————————————————|——————-|
# |10734 |Apple|MacBook Pro (13-inch, 2018)|C02TW0WAHX874|C66B7C82-9CAB-4C89-85BE-7271121592A8|https://jamf.pro.server.here/computers.html?id=10734 |Yes |
# |858 |Apple|MacBook Pro (13-inch, 2018)|C027251024N23|159C6524-5069-41EC-9EDE-81158843F2EC|https://jamf.pro.server.here/computers.html?id=858 |No |
# |421 |Apple|MacBook Pro (13-inch, 2018)|Q027251024R23|A5C73F1F-35BD-4E27-BE63-E5760F886A1A|https://jamf.pro.server.here/computers.html?id=421 |Yes |
# |1217 |Apple|MacBook Pro (13-inch, 2018)|C02F0U5WAHX54|D59F50C3-3559-4B6A-AE04-81FF6BF25349|https://jamf.pro.server.here/computers.html?id=1217 |Yes |
#
# If setting up a specific user account with limited rights, here are the required API privileges
# for the account on the Jamf Pro server:
#
# Jamf Pro Server Objects:
#
# Computers: Create
#
# Jamf Pro Server Action:
#
# Send Computer Remote Lock Command
# If you choose to hardcode API information into the script, set one or more of the following values:
#
# The username for an account on the Jamf Pro server with sufficient API privileges
# The password for the account
# The Jamf Pro URL
# Set the Jamf Pro URL here if you want it hardcoded.
jamfpro_url=""
# Set the username here if you want it hardcoded.
jamfpro_user=""
# Set the password here if you want it hardcoded.
jamfpro_password=""
# If you do not want to hardcode API information into the script, you can also store
# these values in a ~/Library/Preferences/com.github.jamfpro-info.plist file.
#
# To create the file and set the values, run the following commands and substitute
# your own values where appropriate:
#
# To store the Jamf Pro URL in the plist file:
# defaults write com.github.jamfpro-info jamfpro_url https://jamf.pro.server.goes.here:port_number_goes_here
#
# To store the account username in the plist file:
# defaults write com.github.jamfpro-info jamfpro_user account_username_goes_here
#
# To store the account password in the plist file:
# defaults write com.github.jamfpro-info jamfpro_password account_password_goes_here
#
# If the com.github.jamfpro-info.plist file is available, the script will read in the
# relevant information from the plist file.
jamfpro_plist="$HOME/Library/Preferences/com.github.jamfpro-info.plist"
filename="$1"
exitCode=0
report_file="$(mktemp).tsv"
if [[ -r "$jamfpro_plist" ]]; then
if [[ -z "$jamfpro_url" ]]; then
jamfpro_url=$(defaults read "${jamfpro_plist%.*}" jamfpro_url)
fi
if [[ -z "$jamfpro_user" ]]; then
jamfpro_user=$(defaults read "${jamfpro_plist%.*}" jamfpro_user)
fi
if [[ -z "$jamfpro_password" ]]; then
jamfpro_password=$(defaults read "${jamfpro_plist%.*}" jamfpro_password)
fi
fi
# If the Jamf Pro URL, the account username or the account password aren't available
# otherwise, you will be prompted to enter the requested URL or account credentials.
if [[ -z "$jamfpro_url" ]]; then
read -p "Please enter your Jamf Pro server URL : " jamfpro_url
fi
if [[ -z "$jamfpro_user" ]]; then
read -p "Please enter your Jamf Pro user account : " jamfpro_user
fi
if [[ -z "$jamfpro_password" ]]; then
read -p "Please enter the password for the $jamfpro_user account: " -s jamfpro_password
fi
echo
# Remove the trailing slash from the Jamf Pro URL if needed.
jamfpro_url=${jamfpro_url%%/}
# Verify that the file exists and is readable
if [[ -r $filename ]]; then
# Set IFS to read the .csv file by setting commas as the character
# which separates fields in the .csv file
while IFS=, read jamf_pro_id pin_code || [ -n "$jamf_pro_id" ]; do
# Due to IFS redefining field separation, the $pin_code
# value has a carriage return included. The next check
# below trims that off before it can cause problems for both
# curl and the echo message immediately below.
pin_code=$(echo $pin_code | tr -d '\r')
echo "Attempting to send MDM lock to Jamf Pro ID $jamf_pro_id with PIN code $pin_code."
# All Jamf Pro IDs should be positive numbers and
# PIN codes should be all positive numbers that are
# exactly six digits, so we check for those conditions
# before proceeding.
if [[ "$jamf_pro_id" =~ ^[0-9]+$ ]]; then
if [[ "$pin_code" =~ ^[0-9]{6} ]]; then
ComputerRecord=$(curl -sfu "$jamfpro_user:$jamfpro_password" "${jamfpro_url}/JSSResource/computers/id/$jamf_pro_id" -H "Accept: application/xml" 2>/dev/null)
Make=$(echo "$ComputerRecord" | xmllint –xpath '//computer/hardware/make/text()'2>/dev/null)
MachineModel=$(echo "$ComputerRecord" | xmllint –xpath '//computer/hardware/model/text()'2>/dev/null)
SerialNumber=$(echo "$ComputerRecord" | xmllint –xpath '//computer/general/serial_number/text()'2>/dev/null)
UDIDIdentifier=$(echo "$ComputerRecord" | xmllint –xpath '//computer/general/udid/text()'2>/dev/null)
jamfproURL=$(echo "$jamfpro_url"/computers.html?id="$jamf_pro_id")
if [[ ! -f "$report_file" ]]; then
touch "$report_file"
printf "Jamf Pro ID Number\tMake\tModel\tSerial Number\tUDID\tJamf Pro URL\tMDM Lock Successful\n" > "$report_file"
fi
# If the previous checks succeeded, the curl command below
# sends the DeviceLock command, which will then be sent out
# by the Jamf Pro server. The curl command uses the "–fail"
# function to enable curl to send out an exit code, which we
# use to test if the API call was successful.
/usr/bin/curl –fail -su ${jamfpro_user}:${jamfpro_password} "$jamfpro_url/JSSResource/computercommands/command/DeviceLock/passcode/$pin_code/id/$jamf_pro_id" -H "Content-Type: application/xml" -X POST
# curl's exit status is checked below. If curl has an exit status of zero,
# the API call was sent and received successfully. If curl has a non-zero
# exit status, a warning message is displayed which indicates that the API call
# has failed.
if [[ $? -eq 0 ]]; then
echo -e "\nSuccessfully locked computer with Jamf Pro ID $jamf_pro_id with PIN code $pin_code."
if [[ $? -eq 0 ]]; then
printf "$jamf_pro_id\t$Make\t$MachineModel\t$SerialNumber\t$UDIDIdentifier\t${jamfproURL}\tYes\n" >> "$report_file"
else
echo "ERROR! Failed to read computer record with id $jamf_pro_id"
fi
else
echo -e "\nERROR! MDM lock of computer with Jamf Pro ID $jamf_pro_id failed."
printf "$jamf_pro_id\t$Make\t$MachineModel\t$SerialNumber\t$UDIDIdentifier\t${jamfproURL}\tNo\n" >> "$report_file"
fi
# If the PIN code is not all positive numbers
# and exactly six digits, a warning message is
# displayed that an invalid PIN code has been
# provided.
else
echo -e "\nInvalid PIN code provided: $pin_code"
fi
# If the Jamf Pro ID number is not all positive numbers,
# a warning message is displayed that an Jamf Pro ID number
# has been provided.
else
echo -e "\nInvalid Jamf Pro ID provided: $jamf_pro_id"
fi
echo ""
done < <(tail -n +2 "$filename")
else
# If the provided .csv is not readable, a warning message
# is displayed that the file does not exist or is not readable.
echo "Input file does not exist or is not readable"
exitCode=1
fi
if [[ -f "$report_file" ]]; then
echo "Report on Macs available here: $report_file"
fi
exit "$exitCode"
Viewing all 490 articles
Browse latest View live